Are you looking for a way to enable and use two-factor authentications for Gmail? Creating a two-factor authentication helps to provide double security to your account. Do you know that your email addresses are potentially at the top of the list when it comes to data you want to keep secure?
In the last few years, lots of data breaches are occurring. If the hackers can enter the banking system or the Facebook server, why can’t they have a peek in your Gmail account? However, Gmail is very secure on its own, but you never know when someone gets into your system and then steals a password from your PC and then misuses it.
That’s the reason why having a two-factor authentication helps you to protect your confidential and essential mails from being misused by others. In this article, we will see that we can enable and use two-factor authentication for Gmail.
What Is Two-Factor Authentication?
Two-factor authentication (2FA), commonly known as multiple-step Verification, is a method of determining a user’s validity by verifying their identity twice. In most cases, an online account holder will be asked to use two different passwords to gain access to their account.
It means that whoever has access to your accounts can access both your physical device and virtual keys. It creates a basic password break or social engineering attack ineffective for gaining access to your personal information.
How Does Two-Factor Authentication Work?
After enabling the two-factor authentication for your Gmail account, all you have to do is go to your Gmail and then enter your email address and password. After entering your Id and password, a new 2 step verification tab will open. There select the get a code option, and then a code will be sent to your mobile phone. Enter that code in your PC, and then your Gmail account will open.
If you don’t want to type the password again and again, then you can also select the ‘Don’t ask again on this device’ option. By doing this, you don’t have to type a verification code on your device. 2-Step Verification will be needed if you or someone else attempts to sign in to your account from a different device.
How To Set Two Factor Authentication For Gmail
Setting two-factor authentication for Gmail is not a challenging task. Here is how you can simply set up the authentication for your Gmail account.
Step 1: Open your web browser on your PC, and then in the browser’s search box, type ‘myaccount.google.com’ and then press enter.
Step 2: You will be redirected to your account setting page. If your google account is not enabled, click on the sign-in button located at the top right corner of the screen.
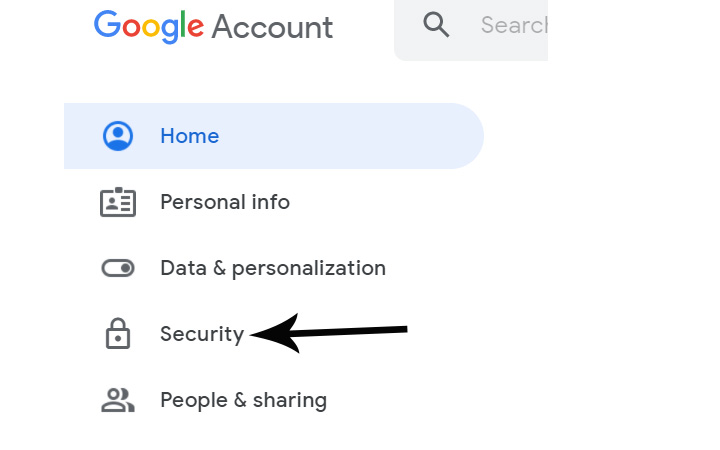
Step 3: From the side menu, click on the ‘Security’ option.
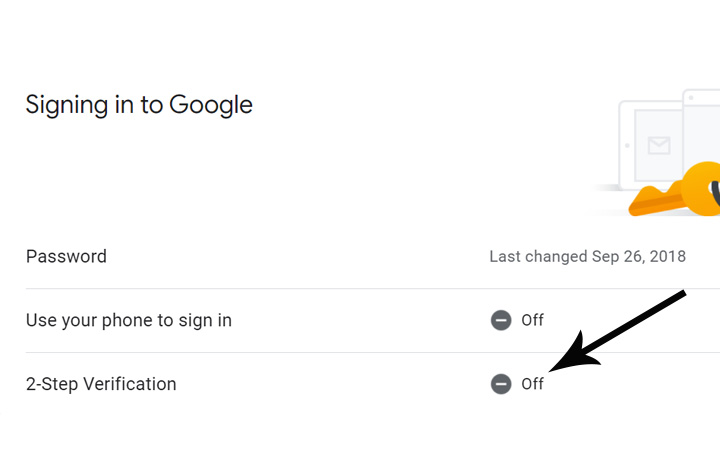
Step 4: Under security, scroll down a little bit, and then you will see the ‘2-Step Verification’ option. By default, it is set off. Click on that option to begin with the enabling process.
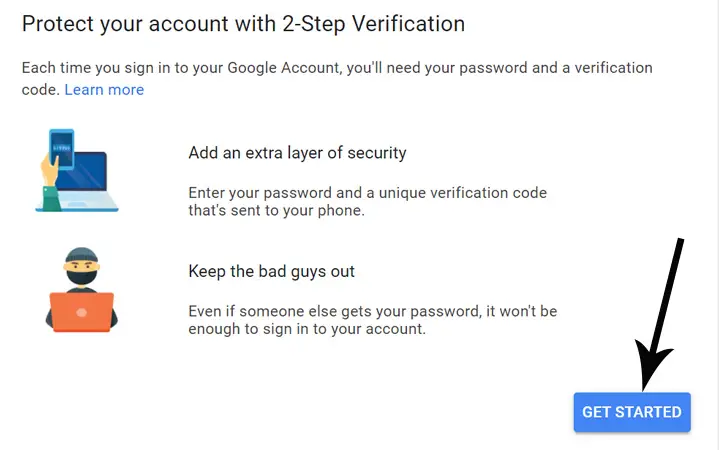
Step 5: After clicking on the 2-step verification option, the next form will open. There you don’t have to do anything. Just click on the ‘Get Started’ button.
Step 6: After clicking on the get started button, you will be asked again to enter the password. So, you have to enter your Google account password and then click on the Next button.
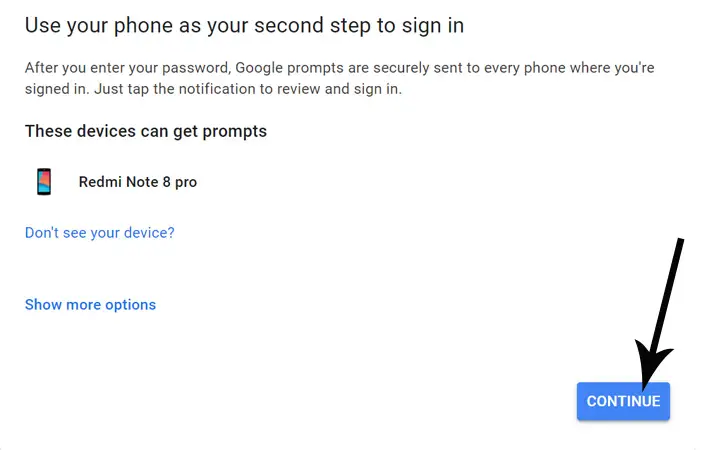
Step 7: If you are logged in with the same Google account on your smartphone, it will also show your smartphone name. If not, you can click on the ‘Don’t see your device?’ option and then setup. After that, click on the ‘Continue’ button.
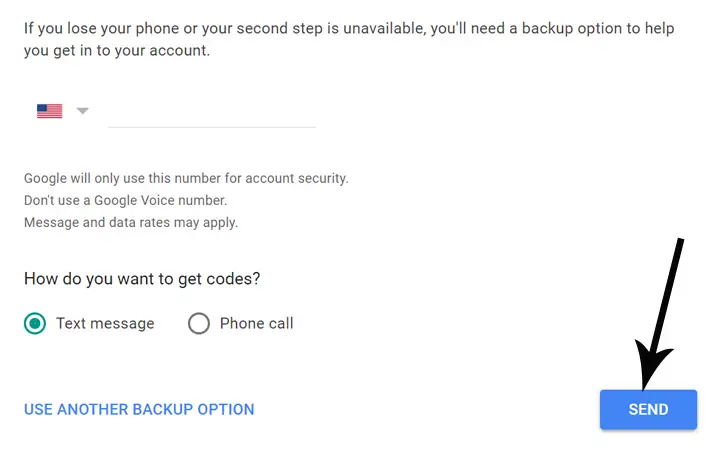
Step 8: After clicking on the continue button, you will receive a notification on your phone. There click on the yes button. On your PC, check your mobile number, and then in the bottom checkbox, select whether you want a text message or a direct phone call. Then click on the Send button.
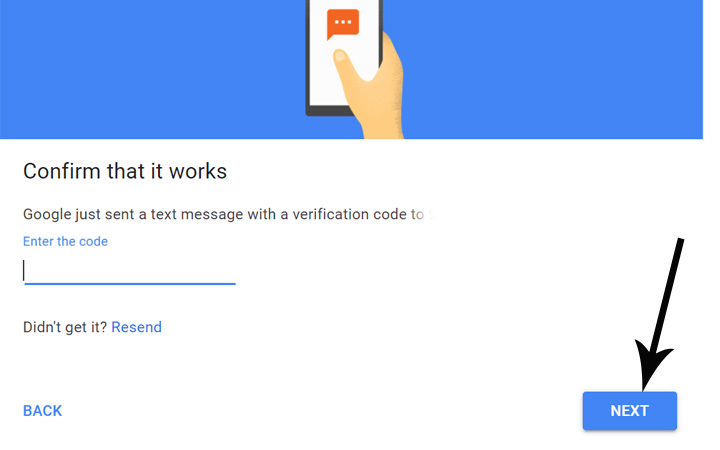
Step 9: Then, you will receive a code on your phone. Enter that code in your PC, and then click on the Next button.
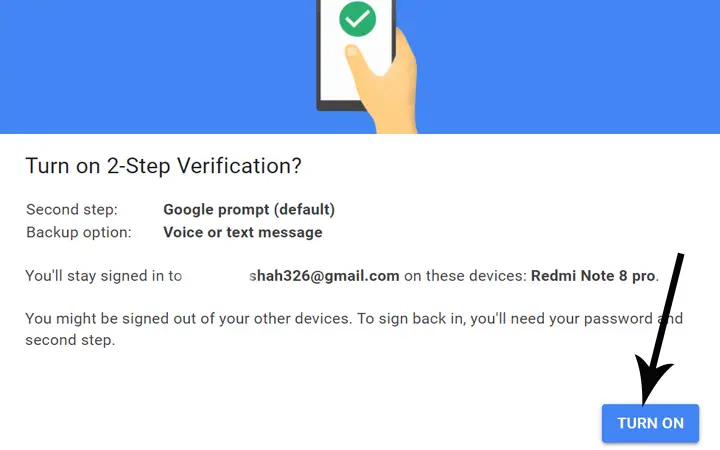
Step 10: The process is almost complete. In this last step, you just have to click on the ‘Turn On’ button and then again verify your google account by entering your password.
How To Turn Off Two Factor Authentication
If you don’t want to use the two-factor authentication for Gmail, you can turn it off. To turn off the two-factor authentication, follow the following steps.
Step 1: Open your web browser and then type ‘myaccount.google.com’ on your browser’s search box and then press enter.
Step 2: From the side menu, click on the ‘Security’ option.
Step 3: In security, scroll down and then click on the ‘2-Step Verification’ option.
Step 4: Enter your Gmail account’s password and click on the ‘Turn off’ button.
Step 5: A confirmation pop-up menu will appear. There again, click on the ‘Turn Off’ button. After this, your 2 step verification will be turned off.
Conclusion
I hope from the above method you were able to set up the two-factor authentication for Gmail. Having such a security method always helps you to stay on the safe side. There are also many third parties authenticator apps on Playstore and Applestore that you can use to enable the two-factor authentication.
If you have any confusion or problem setting up the two-factor authentication, let us know your query in the comment section. We will be there to help you get rid of your confusion.