For anyone who uses Outlook for day-to-day communication, manages their calendar and to-do lists, creating an email group can save you a lot of time if you happen to email a set number of users most of the time. Outlook contacts can be added to custom groups, or you can create groups without making them a contact.
This is a step-by-step guide on how to create an email group in Outlook 365 desktop app or Outlook Web app. For any questions or queries, please leave them in the comments section below.
How To Create An Email Group In Outlook 365 Desktop App
It’s not necessary to have an email address as a contact but having a list definitely makes things easier when creating groups. Email Groups are a handy tool if you are looking to send an Evite via email to all your colleagues and friends.
To create an email group in Outlook desktop app, follow the steps:
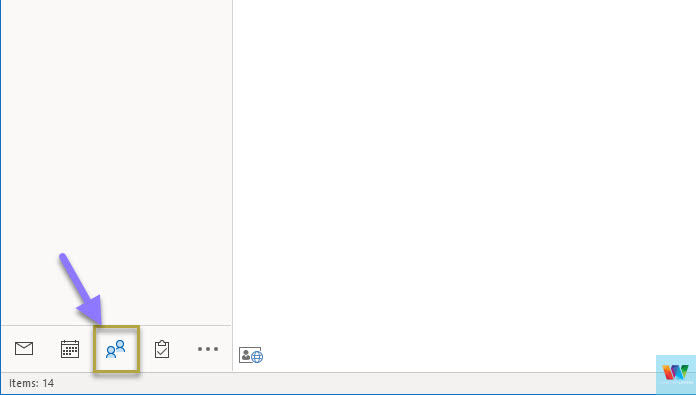
- Open the Outlook app and click on the contacts icon.
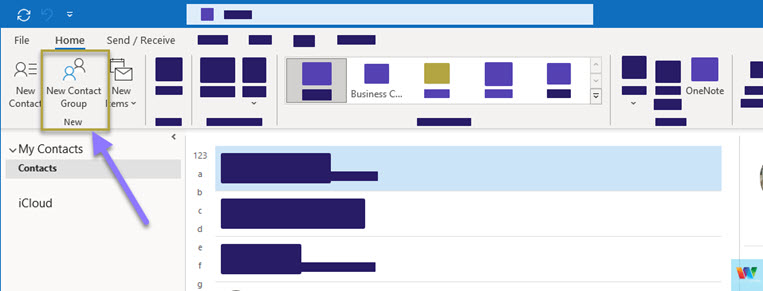
- On the top menu bar, click on “New contact Group”.
- This opens up a new window where you create your email group from.
- Give your email group a descriptive name that you can remember.
- Click on the “Add Members” button on the menu bar and choose how you would like to add the members for this group.
- You can either add a new email address.
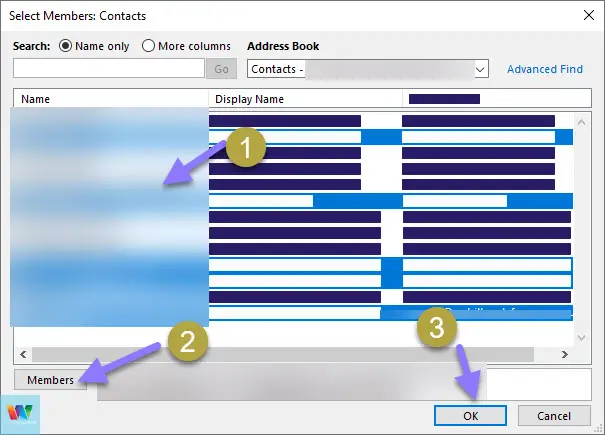
- You can also add users from you current contacts and the address book.
- To select multiple users, hold the “Ctrl” key on your keyboard and click the contact.
- Once all the users have been selected, click on the “Members” button and finally click “Ok”.
- Check if all the details of the users that have been added to the group is correct.
- Finally, click “Save & Close” to save the group.
That’s how you can create a contact group/email group in Outlook 365 desktop app.
READ: How to delete contacts from the outlook app
How to use these Contact Groups to send emails
Alright, so once you’ve created these email groups, sending emails to everyone on that group becomes very easy.
- Start a new email and in the “To” section, type the name of the email group you just created and add it to the “To” section.
- Type out the remaining body of the email and hit send.
- The same email will be sent out to all the email addresses that are inside the Email group.
How To Create A Group in Outlook Web App
Similar to the desktop app, if you are a predominant user of the Outlook web app, you can still utilize the Groups feature.
To create an Email Group in the Outlook web app, follow the steps below:
- Go to Outlook online web app and login with your credential.
- Click on the contact icon from the list of options on the left-hand side of the outlook homepage.
- Click on the downward point arrow on the “New contact” button and open “New group”.
- Give a meaningful name to the group that you can remember down the road and also a description to that group if you prefer. After that, click on “Create”.
- Unlike the desktop app, you cannot select multiple email addresses or contacts on the web app.
- You can search for the contact or type the email address if that is not in your contact list and click “Add” at the end.
- Your group will be created and is ready to use.
How To Access Groups On Outlook Web App
Unlike distribution lists on Outlook, you can do much more with email groups.
When on the Outlook’s homepage, scroll towards the bottom and expand “Groups”.
Open the group you created earlier and under “Apps” you can see different options you have available where you can use this group for.
Like you can share files with the group, send calendar notifications or emails to everyone at once.
Outlook Email Groups FAQs
What is the difference between a contact list and a group in Outlook?
The main difference is that the list can be used to send emails to multiple users in a single click. Whereas Outlook Email groups provide much more features like sharing files, creating bulk calendar events, etc.