If you are familiar with the BSOD (Blue Screen Of Death) error in Windows systems, you might have faced a “page fault in nonpaged area” BSOD error at some point in time. These are mostly caused by kernel failures in Windows, meaning critical files required to boot into windows are either missing or corrupt. Solutions are quite similar to the “System Thread Exception Not Handled” BSOD error but is easier to fix.
This is a step-by-step guide on how to fix page fault in nonpaged area blue screen error on Windows 10 systems. If you have any queries or run into any issues, please get in touch via the comments section below.
For booting into windows quicker, there are some files that are stored on the RAM and do not change very often. If there were some changes made to the files or if they were removed and the necessary changes were not propagated to the OS, the next time you start windows it fails to find the files required to load the operating system. Thus, the system runs into this blue screen of death error. You might also see the Windows black screen error, which also has similar reasons behind it.
Regardless, if you can or cannot boot into your Windows account, I highly suggest you carry out these troubleshooting procedures in the Windows Recovery Environment.
How To Boot Into Windows Recovery Environment
If you can log into windows and run into page fault in nonpaged area error intermittently, you can boot into WRE from within Windows 10.
If you constantly run into this Blue Screen error, follow along to see how to boot into WRE.
Boot Into WRE If You Are Not Able To Get Into Windows
Completely turn off your computer, this works for both desktop and laptops. Turn it back on, but as it starts to boot up, press and hold the power button until it shuts down completely. You need to do so before it gets to the error page.
Do this twice and the third time, let it boot normally and you should be taken to the Windows recovery environment.
Boot Into WRE from Windows 10
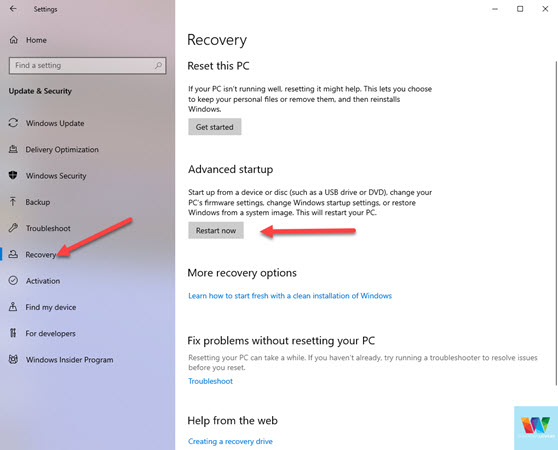
Go to Start and search for “Settings”.
Open “Update & Security” and click on “Recovery” from the left-hand side. Under “Advanced startup” click on “Restart now”. The system won’t ask for confirmation and will restart into WRE straightaway so if you have anything not saved, please do so now.
Once the system is in the recovery environment, we can start applying the fixes.
Page Fault In Nonpaged Area Windows 10 – Solutions
Depending on how much time you’ve spent on other forums and blogs trying to figure out a solution for this, I have only mentioned the ones that work. This should help you some troubleshooting time and really find the culprit behind the page fault in nonpaged area error.
1. Startup Repair
You might have already done this or Windows 10 might have automatically tried repairing your startup. If not, I would highly recommend you do so. This eliminates a lot of issues regarding startup and boot file discrepancies.
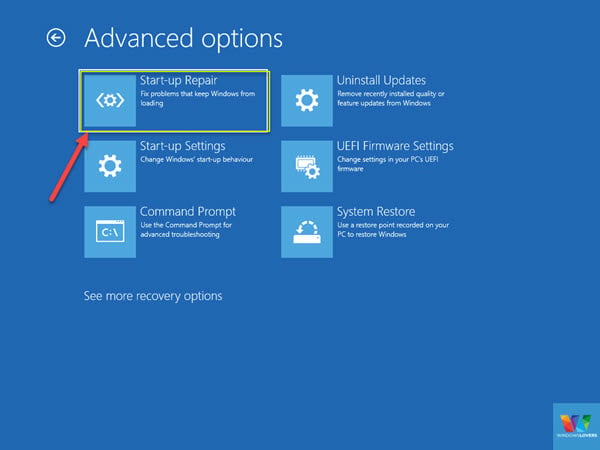
Click on Troubleshoot > Advanced options > Startup Repair.
Your computer should automatically restart and take you to the account selection window. Select the user account you use to log into windows.
Windows 10 will try to repair the startup and if it is able to do so, you will be taken to the normal login screen.
If it is unable to do so, there might be some major issues and might need further troubleshooting.
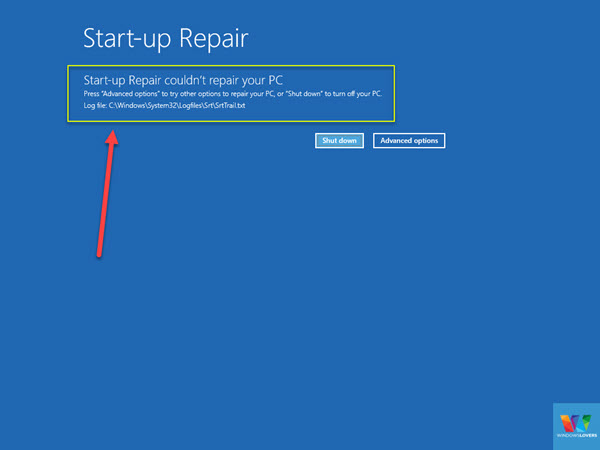
As you can see in the screenshot, the Start-up Repair could not fix my issue.
If it’s the same in your case, proceed to the next step.
2. Diagnosing and Fixing Disk Errors
If you recently installed updates on your Windows 10 system or installed any application that tweaks or tampers with system files, running a diagnostic and fixing it should put things back in place.
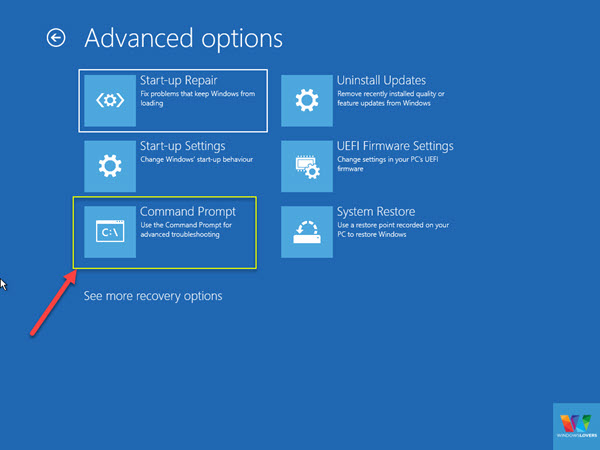
In the WRE options go to Troubleshoot > Advanced options > Command Prompt.
You should be aware of which drive your Windows is installed on. By default it’s ‘C:’ please make changes to the following command and replace the drive letter accordingly.
My windows installation is on X: so I will enter the following command on the Command prompt screen.
Chkdsk /f /r
It will prompt you that the drive is being currently used and it will run the checks next time the system restarts. Type “Y” and allow this action.
If your computer is capable of connecting to the internet, enter the following command that checks for any bad sectors and files and replaces them.
Use this command if you can log into Windows, this will not work in the WRE mode.

DISM.exe /Online /Cleanup-image /Restorehealth
If not, you can just run the disk check and repair utility by entering the following command.
Sfc /scannow
The diagnose and fix will take some time, so grab a cup of coffee and let it do its thing.
After this has been completed, close everything and restart your computer. The computer should get into “checkdisk” mode as that was set earlier. Once the CHKDSK has been completed, the system might restart one more time.
Hopefully, this resolves the page_fault_in_nonpaged_area windows 10 error.
3. Uninstall Recent Updates
If you are facing this issue after any windows update, you can uninstall the update and see if that is the reason you are receiving this error.
Go to Advanced options > Troubleshoot > Uninstall Updates.
You have two options to choose from, “Uninstall the latest quality update” or “Uninstall the latest feature update”.
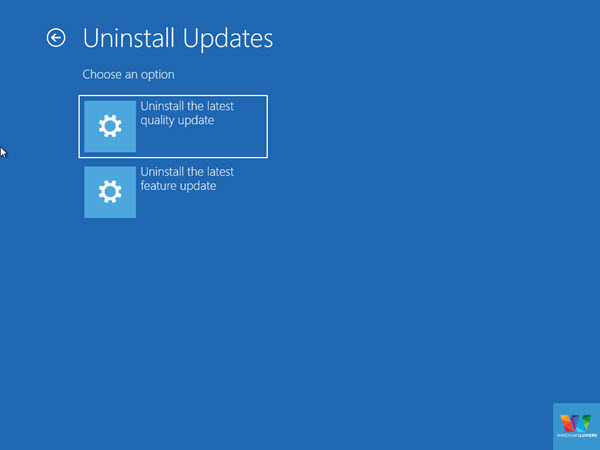
If you are not sure what kind of update was the recent one, just try uninstalling both and see if you get any success.
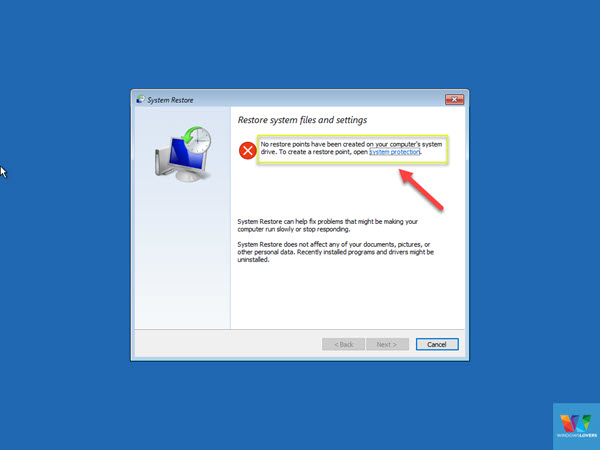
4. System Restore
System restore should be your first go-to option whenever your system runs into any kind of issue. Of course, the previously mentioned troubleshooting steps are definitely a lifesaver, but System restore can take your system back to a start where you were not receiving the page_fault_in_nonpaged_area error.
Go to Advanced options > Troubleshoot > System Restore.
If you get an error similar to the one in the screenshot below, that means there are no past restore points created. Restore points can be created manually by a user or automatically by the Windows system. Usually, windows created a system restore point prior to a major upgrade, update, or software installation.
For a more detailed guide on how to use the System Restore tool, please resort to the first solution on the guide for The System Cannot Find The File Specified fix.
5. Perform a Clean Boot On Windows 10 – Safe Mode
A clean boot on windows 10 means disabling any application or process that does not aid the startup and login process. Only the components and apps required for the computer’s startup will be enabled and loaded.
To get into the Safe Mode, go to Troubleshoot > Advanced Options > Start-up Settings.
Remember we are booting into just Safe Mode, without any networking or other capabilities.
Click on the “Restart” button and the computer will restart and give you different options to choose from. Use the function keys on your keyboard to enter the mode you want.
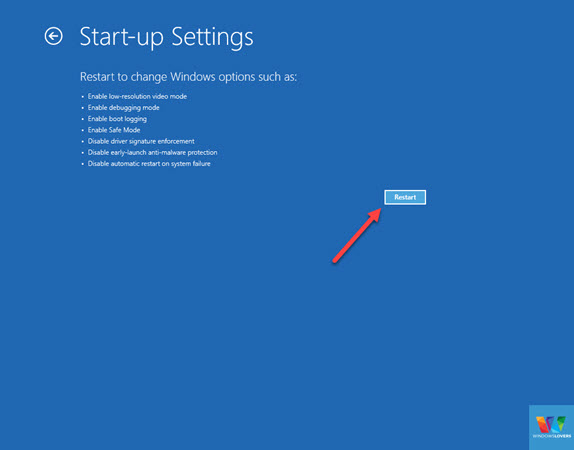
No(4) should be the Safe Mode so hit the F4 key, unless it’s different for you.
Once you are in Safe Mode, there are lots of things you can try. I usually do the following things to see if it solves the page fault in nonpaged area error.
5.1 Clean Boot Windows 10
Open Start and search for “System Configuration”. Click on the “Services” tab, click on “Hide all Microsoft services” and click on Disable all.
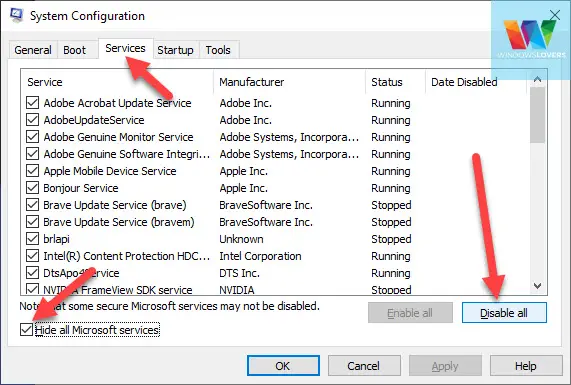
This disables any app or component not required to safely boot into windows. If you are able to get into windows after disabling these services, definitely one of the apps on the list is causing issues.
5.2 Uninstall Recently Installed Apps
If you recently installed any application and started getting this blue screen of death after that, you should uninstall it.
5.3 Uninstall Devices
Any driver updates that you know we’re done recently? Go to the device manager and uninstall that device. You can search for the device manager at the start.
When you uninstall the device, Windows will try to install it with the correct files and this might fix your issue.
6. Refresh / Reset Windows
If nothing seems to be working and you cannot be bothered, you can always reset your computer to its initial state. It’s the closest thing to reinstalling windows, but I do it every now and then to speed up my windows 10 laptop.
To reset or refresh your Windows installation, Go to Troubleshoot > Reset this PC.
If you would like to keep any files or documents that might be on the C: or the drive you have windows installed, click on “Keep my files” otherwise click on “Remove everything”.
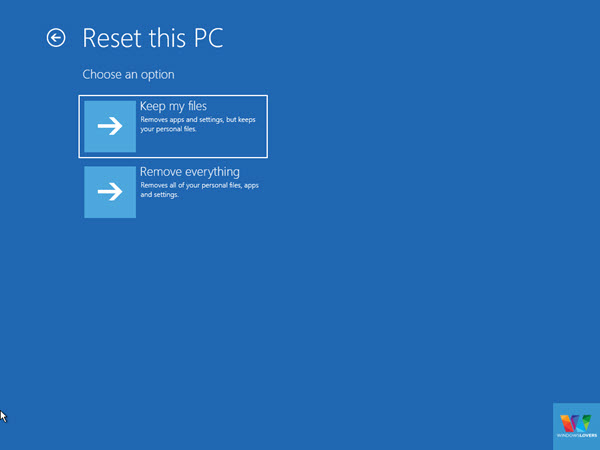
Note: Either of these options will remove any third-party application installed on your computer.
Once the computer has been reset / refresh, page_fault_in_nonpaged_area error should be resolved.
Summing up Page Fault In Nonpaged Area Solutions,
Hopefully, you were able to get rid of the page fault in nonpaged area error following this guide. Microsoft’s Windows operating system is nowhere perfect like any OS out there, but sometimes you might be facing the same error as other users but the reasons for that error might be different.
It does take time to resolve these errors but I would say it’s always better to try and fix these page fault in nonpaged area BSOD errors so that in the future you can fix them quicker.