Are you trying to add something to the windows startup or remove some apps from auto startup? Until Windows 7, there was a startup folder, but where is the Windows 10 startup folder gone now?
If you are trying to stop some applications from the auto startup in windows 10, you will not find that in the Windows 10 startup folder. More on that later, first let’s find the startup folder in Windows 10.
Where Is Windows 10 Startup Folder?
If you are wondering where has the Windows 10 Startup folder been moved, Microsoft has removed it. Until Windows 7, if you click on Start > All Programs > Startup, you would see the startup folder and all the applications and files in it.
In Windows 10, you cannot find this folder readily available to you. Microsoft must have removed it on purpose.
Before I give you the paths for the startup folder, you want to understand the purpose you are trying to access this folder for as there are multiple startup folders depending on what you are looking for.
Few things I would keep in mind are :
- Is this a shared computer and multiple users? If that is the case, you would have to make sure that the changes you are making should apply to all the past, current, and future users that will use this computer?
- Are you making this change for a particular user?
- If you are trying to alter the way applications are loading on the startup, the windows 10 startup folder would not have these apps.
READ: Best Free Screen Recording Apps For Windows
Locate Win 10 Startup Folder Using Windows Explorer
Before you try to find the folder, make sure you have the hidden files enabled- meaning you should be able to see the hidden files and folders.
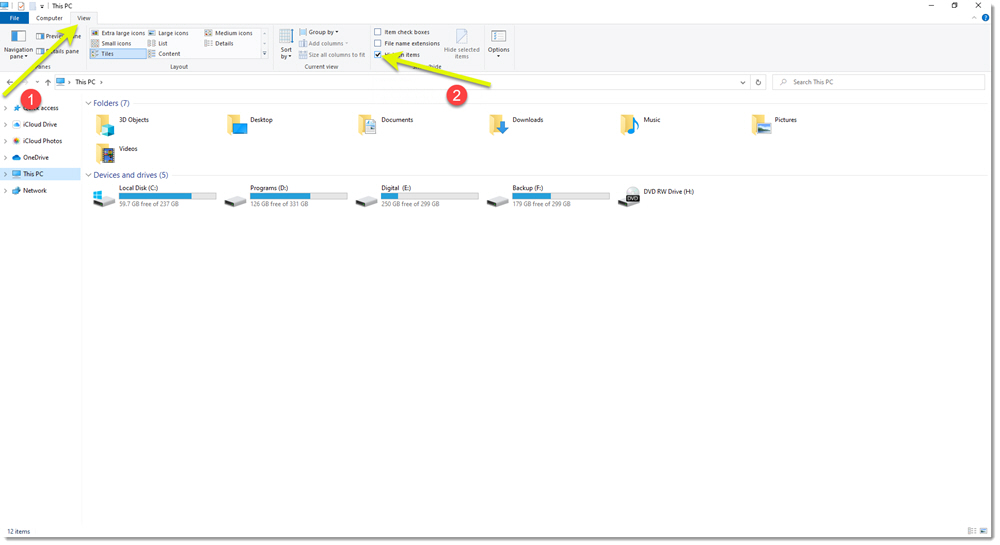
- Open the file explorer
- Click on the View – Tab and make sure the “Hidden items” option is checked. This means you will be able to see the hidden files and folders
The Startup Folder For All the users
The folder in the following location is the startup folder not specific to any user. Instead, it’s a shared folder that applies to all the users that login to the system.
C:\ProgramData\Microsoft\Windows\Start Menu\Programs\StartUp
The Startup Folder For A Specific User
Let’s say you would like to add a specific program to a user -AB’s startup.
You would go to the following folder – C:\Users
Find the user “AB” and navigate to
AB\AppData\Roaming\Microsoft\Windows\Start Menu\Programs\Startup
The full location to the Win 10 startup folder for the user AB is –
C:\Users\AB\AppData\Roaming\Microsoft\Windows\StartMenu\Programs\Startup
Now you can add startup programs to windows 10 OS for this user, and every time the user logs into the computer, the program will automatically run.
Is this all too confusing? If it is so, you can get access to the main startup folder using the RUN.
- Hit the “Windows” + “R” key – this will bring up the RUN application
- Type “shell: common startup” into the window without any space and hit enter
- It opens a folder. This folder is the main Startup folder for the system.

- If you want to add startup programs to Windows 10 system regardless of the user logging in, you can add them to this folder.
- So next time, if anyone logs in, that program will automatically run.
If you want to save some time and quickly need to add something to the current user’s startup folder, type “shell:startup” instead.
The folder that opens up is specific to the current user logged in.
READ: How to make Chrome your default browser in Windows 10
Managing Startup Programs in Windows 10
So, if the Windows 10 startup folder is empty, how do we manage the startup programs in Windows 10.
Microsoft has made it very easy for us to manage the Startup programs in Windows 10. Okay, let me rephrase that again.
It is effortless to manage the auto startup apps on windows 10 once you know where to look for them.
- To see all the current apps that are set to start automatically on startup, click on the “Type here to search” bar on the bottom left corner and type “startup”
- The next window you see will list all the apps that are on the startup list. Not all the apps might be enabled to run on startup, but you can easily toggle that on and off from this screen.

- One of the best features of this is the level of impact a particular application has on the startup that is provided next to the toggle switch.
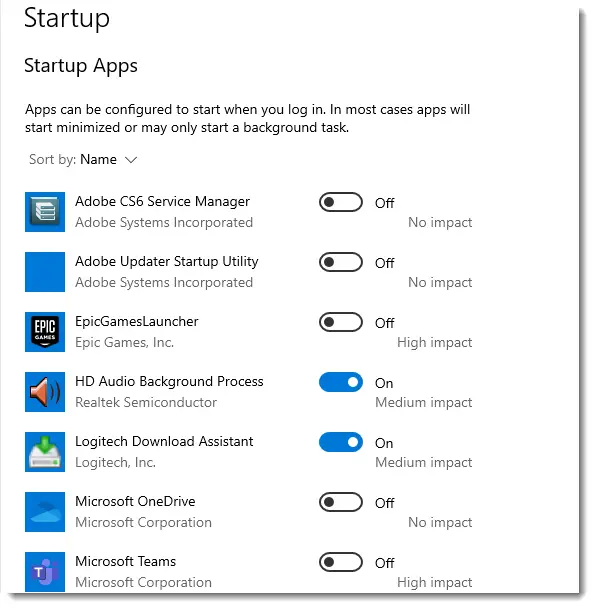
You can manage all the apps in one place, how cool is that.
One suggestion I have is to turn all the apps that have a high impact off. But only if you know that the application is not crucial to loading the windows correctly.
How To Add Startup Programs in Windows 10
You don’t see an option here to add a new program. How do you do that?
Before going further, I want to make sure you copy the correct file to the startup folder. You cannot just paste a “.exe” file of an application and expect it to work- which might but sometimes it might throw an error.
The safest way to do this is as following:
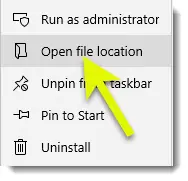
- Find the application that you are planning to add to auto-startup
- Right-click on the app > Open file location
- Once the file location window opens up, right-click again and “Create a shortcut of the app”
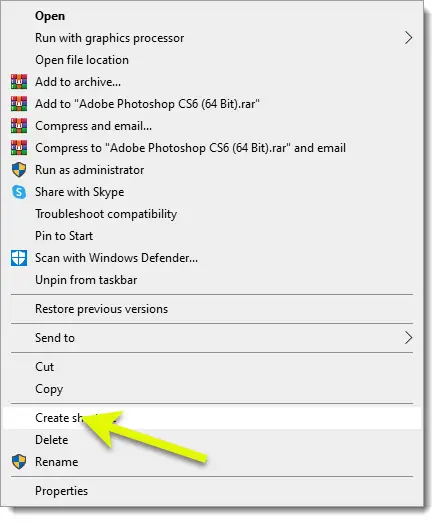
- If it gives you an error, “Windows can’t create a shortcut here.” Error –go ahead and click on “Yes”
- This will place a shortcut for that application on your desktop. Find that file, and you are all set to add that application to the Windows 10 Startup folder.
Adding it to the Win 10 startup folder will auto-start the app. The only thing you need to make sure of is which users should have this app on startup. You can read this post from Microsoft as well if you are not still sure how to get this done.
Remember, in the post earlier, how to access the Startup folder on your Windows 10 system?
If you skipped through it –
To add a program to startup for all the users
- Start Run – “Windows key” + “R”
- Type “shell:common startup”
- Copy the shortcut file that you created earlier to this folder
- Restart the computer and check if that app has been added to the startup
To add a program to startup for the current user
- Start Run by hitting the “Windows key” + “R”
- Type “shell:common startup” in the window
- Copy the shortcut file that you created earlier for the application to this folder
How To Add Startup Programs In Windows 10 For Specific User
First, you need to enable the “Hidden items” – I go through this in the paragraphs before.
- Go to: C:\Users
- Find the user that you are trying to add the application for
- Alternatively, go to the following path, replace the “Windowslovers” with the username of the user you were trying to startup app for.
- C:\Users\Windowslovers\AppData\Roaming\Microsoft\Windows\Start Menu\Programs\Startup
- Paste the shortcut that you created earlier to this folder.
- Every time the user logs in into the computer, the app shortcut will be initiated.
That’s how you can access the Windows 10 startup folder and manage the auto startup apps in Windows 10.
If this was not quite clear, please leave a comment down below and I will get back to you.