Lots of tech-savvy people mostly start their YouTube journey with screen recordings of themselves teaching the viewers how to solve or do something on their computer. Well, I also have a few on my channel if you want to watch them, you can find them here. Most of them use a free online recorder software to get started as I do.
This article aims at providing the best free screen recorder applications for windows 10/11. If you are also planning to start your own YouTube show or a channel. These free online/offline screen recorders will definitely help you get started. If you really like the applications, we would suggest you go forward and buy them.
Best Free Screen Recorder Applications For Windows 10/11
Well, there are a bunch of different applications and services that can do the job for you. I will be basically explaining some of the offline and online free screen recorder applications that I frequently use to record my screen on windows.
1. Bandicam
Bandicam is hands down the most simple and best free screen recorder I have personally used it to record my screen for youtube for years now. It is available for free download from its website, and you can get it from here too.
Please Note: The free version of Bandicam only allows for 10 minutes of screen recording with a watermark. If you want to remove all these limitations, you should upgrade the free screen recorder to the full version premium. I highly recommend you do so, you will not regret it.
I have been using Bandicam for about a month now and boy, this free screen recorder is awesome. (Note: I have now actually upgraded to the full version of Bandicam). Even though I do not record hardcore gameplay or any high-end videogames at 120 FPS, if you are into that, Bandicam does the job for you.
I use Bandicam to record my screen and I use the following settings for my screen recording session.
- 1920 x 1080 resolution at 60 FPS
- Nvidia Graphics Acceleration
If I have to underline some of the awesome features of this free screen recorder, it will be.
- Full HD recording of gameplay screen at max 120 FPS.
- GPU acceleration and support are available.
- 4K ready and much more.
Read More Awesome Features About Bandicam Here.
Every time I search my Youtube comments, there are a lot of people asking what app they should use and I usually suggest bandicam. Of course, there are other better options out there, but this is easy to download and setup and completely free too.
2. Screencast-o-matic
Screencast-o-matic is the best online/offline app that I have come forth that allows seamless recording and saving of your screen recordings. The website does give you the “free online screen recording” option, but for some reason, I do find it useful to download the offline installer itself.
The reason, when you go for “start recording” on the website, you are requested to download the application to continue. And if you prefer installing the offline version, you still need to download the installer and the file size in both cases are identical. So, to download and install the app, the following is the procedure.
Downloading and installing Screencast-o-matic
Head over to Screencast-o-matic.com and click on “Launch Free Recorder”.
After the downloading has been successfully completed, you are good to go. The installation of the app itself is really easy and simple. Just open the installer from the downloaded location and hit the next button a few times and you are all done.
Using screencast-o-matic
The screencast is really easy to use. But despite, its simple user interface and less option to choose from, you will not be disappointed when it comes to the output quality of your video, and the rendering speed is quite impressive. If none of these things makes sense, well that means that screencast does a really good job for free screen recording software. There is one catch though, all the videos that you record using a free version of the software will get a watermark as shown in the screenshot below. If that bothers you, you should look into buying this software or look for other services.
- After the installation is done, run the app from the desktop or the location you placed the shortcuts on.
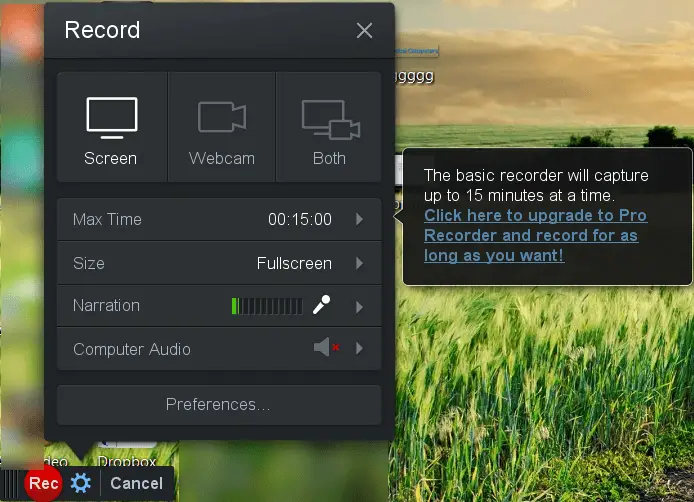
- You should see the recorder’s window as follows.
- Now you need to select what area and what kinds of inputs that you actually want to record with the app.
- You can select to record the screen, or just the web camera or both the screen and the webcam at the same time.
- Next comes to duration, assuming that you are using a free version of the software, you will be able to record a video of length only until 15 minutes.
- Just below that, comes the size of the actual recorder’s screen. You can either just select the active window, 480p or 720p screen size or the whole screen itself.
- If you also use narration on your videos, the application can also record the audio or the computers audio. Just select the right kinds of input under the option. (To record Computer audio, you require a Pro version of the software)
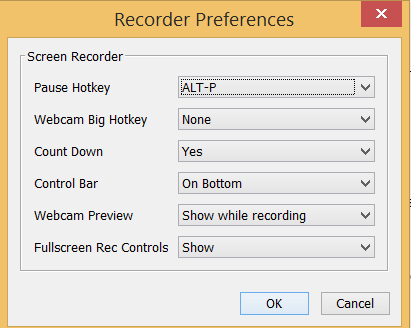
- Pause Hotkey: Define a shortcut key to pause the active recording.
- Webcam Big Hotkey: If you are recording both the screen and webcam at the same time, pressing this assigned key will make the webcam’s recording region appear bigger on the screen and switch the other window to a smaller one.
- Count Down: Choose whether to show a countdown before the recording starts, when you press the “Record” button.
- Control bar: Decide the location of the Control Bar
- Webcam Preview: Whether show or not to show the webcam’s preview while you record the webcam.
- Fullscreen Rec Controls: Whether or not to show the application’s recording controls.
Now that you are little familiar with the control and the features of the application, its time to actually use and record some screencast videos.
Recording The Screen With Screen-o-matic
So, now that you are familiar with all the controls of the applications, lets see how to use it and record a screencast video.
- Open the app from the desktop or the start menu.
- You should see a similar s
- creen as shown below.
- Click on the red button that says “Rec”, or you can use the previously selected hot key.
- After you are done, press the pause button or the hot key to pause the recording operation.
- You can now play the video that you just recorded by pressing the play button, just next to the “Rec” button and if you are happy with the recorded footage, click on Done.
- Now you will be presented with the options to save the video, you could upload it to Screencast-o-matic or even to YouTube straight away.
3. BB (Blueberry) Flash Recorder
Bb flash recorder is my personal favourite and I use this software to make all of my YouTube videos. Well, if you are not familiar with the different kinds of options and customization features that you might see once you install the application, I will be demonstrating and explaining the only options that you will have to consider to create a screencast for your use.
First, download and install the free version of the BB Flash recorder from HERE.
The installation is pretty simple and you should be able to complete it without any problem. But if you face any kinds of difficulties or errors during your download and installation process, hit me via the contact page or on my Facebook page.
Let’s get into the app itself and see how to properly record screen on your windows.
The app comes with a 30 day free trial and the trial version has all of the functionalities as that of the premium version. So, I recommend that you try it before actually go and get yourself a premium account.
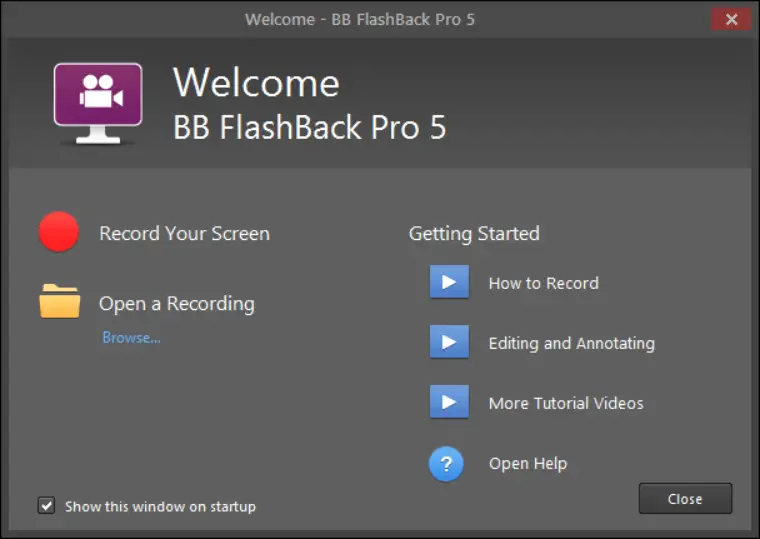
- Launch the “BB flashback recorder” from the desktop or the installed directory. You will now see a splash screen which provides you with bunch of different options. Just simply ignore that and click the “Close” button or you might even uncheck the button that says “Show this window on startup” and you will not see this splash screen in the future.
- You should now see the dashboard of the screen recorder. Let’s see the options at a glance.
- You can select the area that you want to record. Be it the whole windows itself, a specific region or a particular window.
- You can record the audio for narration from the app itself or let it as it is if you are not planning to or if you will be using an external application to record the audio.
- Third is the option to whether or not record the webcam.
- Final is the option to minimize the interface of bb flash recorder while it is recording the screen.
Some of the key points to remember if you plan to use BB flash back recorder
- You might have to first understand the specifications and capabilities of your computer. If you want to record really high quality screencasts at higher frame rates.
- You can do bunch of different things with the app. Take some time to study and understand all the features and the options of the app before you start recording any videos.
This is just a partially written article on some of the best free screen recorder apps for windows 10/11 as I am currently testing other good screen recording applications.
Make sure to check this post later on. Or follow us on any of our social media accounts and keep yourself self-updated.