If you’re new to streaming or screen recording, OBS Studio is one of the best tools you can start with. It’s completely free, open-source, and loaded with features that work whether you’re going live on Twitch, streaming to YouTube, or just recording your screen for tutorials.
Unlike paid options such as Wirecast or vMix, OBS Studio gives you full control without the price tag — which is why it’s trusted by content creators, streamers, teachers, and gamers all over the world.
In this guide, I’ll show you how to install and set up OBS Studio on Windows 11 and Windows 10, and then walk you through the best OBS settings for streaming and recording. Whether you’re just starting out or want a reliable setup you can use every day, follow along step by step.
How to Download and Install OBS Studio (Windows 11 & 10)
First things first — let’s get OBS Studio installed on your Windows PC.
💡 Tip: Always download OBS from the official site to avoid bundled software or outdated versions.
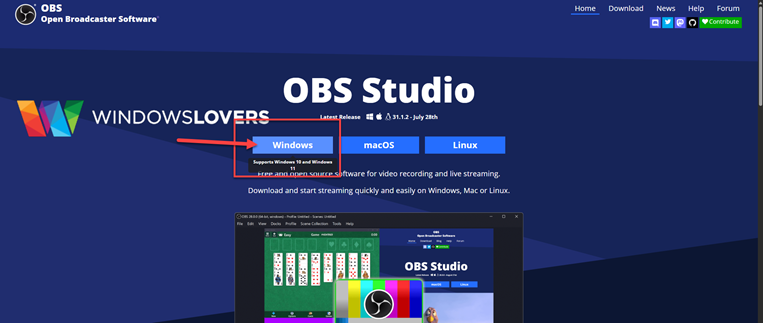
- Go to obsproject.com and download the installer for Windows (there are also versions for macOS and Linux, but we’ll focus on Windows here).
Once the download finishes, double-clickOBS-Studio-Installer.exe. - If prompted by Windows, click Yes to allow installation.
- Follow the setup wizard:
- Click Next
- Accept the license terms (I Agree)
- Choose your install folder (the default is fine for most users)
- Click Install
- When installation is complete, click Finish to launch OBS Studio.
👉 You can skip the Auto-Configuration Wizard for now — we’ll set things up manually in the next steps.
Troubleshooting: OBS Studio Installation Errors on Windows
If you run into issues during installation, here are the most common fixes:
- Missing Visual C++ Runtime → OBS requires the latest Microsoft Visual C++ Redistributable. You can download it free from Microsoft’s site.
- Antivirus blocking installer → Temporarily disable your antivirus if it falsely flags the installer. Make sure you’re using the official OBS download.
If your antivirus keeps interfering, here’s a guide on fixing the “No audio output device is installed” error in Windows — many of the same driver checks apply when software won’t install properly. - “Not compatible” error → OBS only works on 64-bit Windows 10 and 11. If you’re on a 32-bit system, you’ll need to upgrade Windows.
- Installer won’t launch → Right-click the installer file and select Run as administrator.
Once these are fixed, re-run the installer and it should work.
OBS Studio Streaming Setup (Windows Guide)
Now that OBS is installed, let’s get your stream settings sorted. Whether you’re planning to go live on Twitch, YouTube, or Facebook — this step-by-step guide will help you configure everything manually for the best results.
⚙️ We’ll skip General and Appearance for now—they won’t affect quality.
Step 1: Connect OBS to Your Streaming Platform (Twitch, YouTube, Facebook)
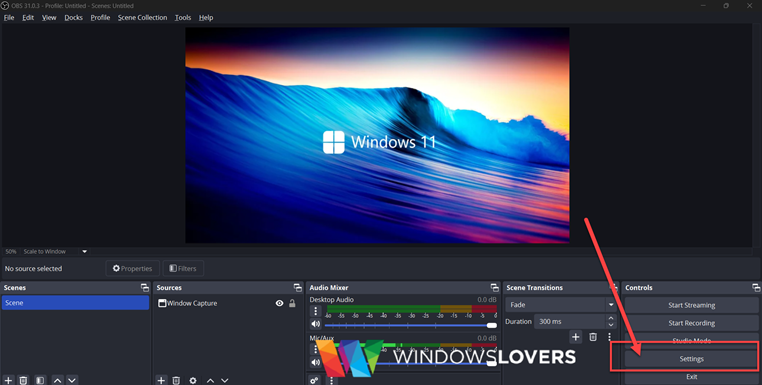
- Open OBS Studio → Settings (bottom-right).
- Go to Stream.
- Pick your Service (Twitch, YouTube, Facebook).
- Log in, or choose Use Stream Key (advanced) and paste your key.
- Leave Server on the default unless your platform asks for a specific region.
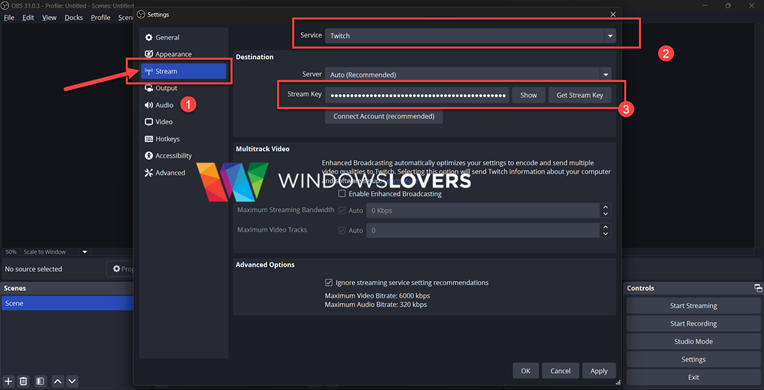
- Click Apply.
Twitch Tips for the Best Stream Quality
- Turn off “Enable Enhanced Broadcasting.”
- Turn on “Ignore streaming service setting recommendations.”
This gives you full manual control over quality later.
Click Apply when done.
Where to find your stream key (quick reference)
- Twitch: Creator Dashboard → Settings → Stream.
- YouTube: YouTube Studio → Go Live → Stream → Stream Key.
- Facebook Live: Live Producer → Stream Setup.
🔒 Security tip: Never show your stream key on stream. Treat it like a password—reset it if it’s ever exposed.
Step 2: Best OBS Output Settings for Streaming
Now that OBS is connected to your platform, it’s time to tell it how to send out your stream. By default, OBS keeps things simple — but switching to Advanced mode gives you full control over quality.
- In OBS Studio, click Settings → Output.
- Change Output Mode from Simple to Advanced.
- Stay on the Streaming tab — this is where all your live streaming settings live.
Recommended Output Settings (Windows)
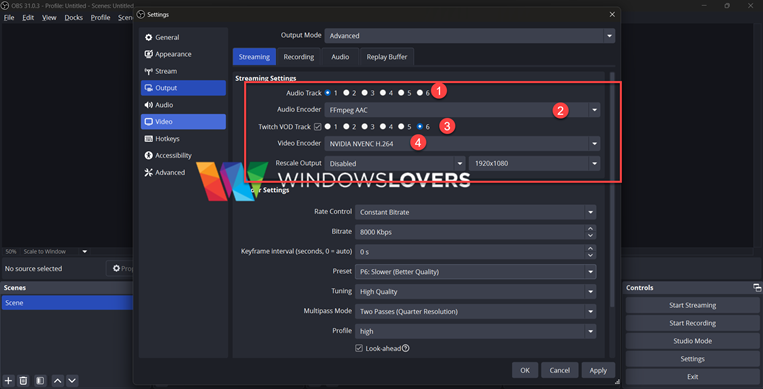
- Audio Track: Keep this on
1— that’s the track your viewers will actually hear. - Audio Encoder: Stick with
FFmpeg AAC. It’s reliable and works across platforms. - Twitch VOD Track: Only turn this on if you play music while streaming. Twitch can mute the VOD later without affecting live viewers.
- Video Encoder:
- If you’ve got an NVIDIA graphics card, choose NVENC H.264 — best performance.
- On AMD, use the AMD encoder.
- No GPU? Select x264, but keep in mind it uses your CPU and may slow things down.
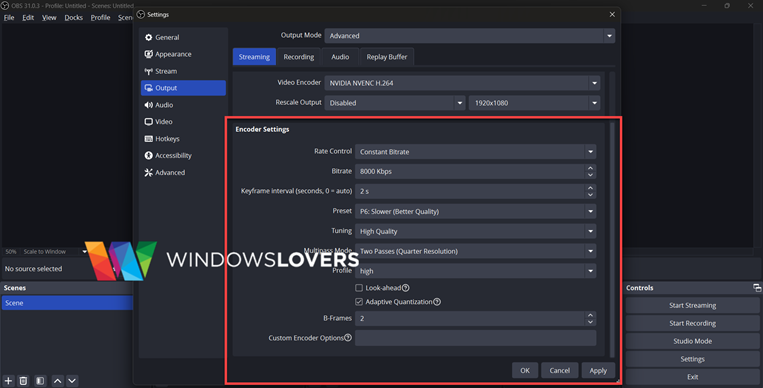
Best OBS Encoder Settings for Smooth Streaming
| Setting | Value / Notes |
|---|---|
| Rate Control | CBR (constant bitrate, stable quality) |
| Bitrate | 6000–8000 Kbps (Twitch max is 6000, YouTube supports higher) |
| Keyframe Interval | 2 |
| Preset | P6 “slower” (higher = better quality, but heavier on your PC) |
| Tuning | High Quality |
| Multipass Mode | Two Passes (Quarter Resolution) |
| Profile | High |
| B-Frames | 2 |
| Adaptive Quantization | Enabled |
⚠️ Quick tip: If your PC struggles, don’t panic. Just drop the preset down to P5 or even lower — you’ll lose a tiny bit of sharpness, but your stream will run smoother.
When everything looks good, hit Apply and move on.
Step 3: Best OBS Audio Settings for Streaming
A great-looking stream won’t matter much if your audio is scratchy or missing — so let’s set that up properly.
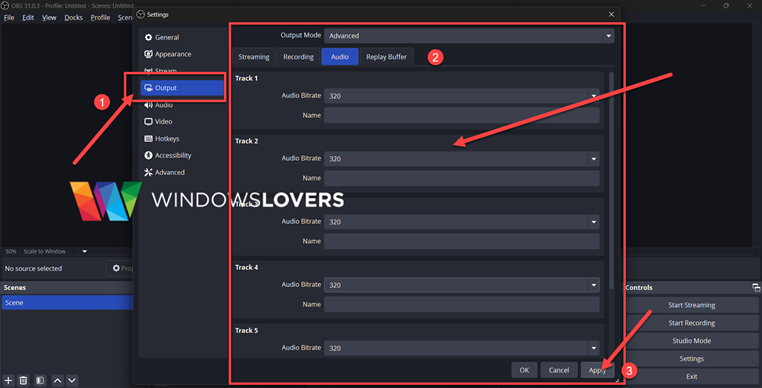
- Open Settings → Output → Audio.
- Change the Audio Bitrate for each track to 320 Kbps. This gives you the highest quality sound without adding extra load.
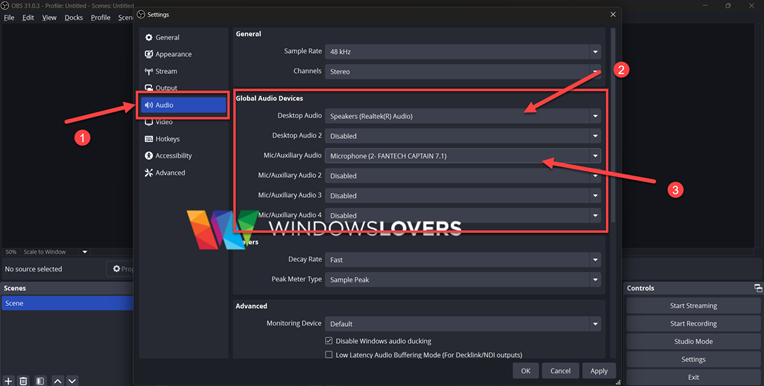
Next, head over to the Audio tab (different from Output):
- Desktop Audio → Select your main playback device (your speakers or headphones).
- Mic/Auxiliary Audio → Pick the microphone you’ll be speaking into (e.g., Blue Yeti, HyperX, Fantech Captain 7.1).
Once that’s done, click Apply.
🎧 Pro Tip: If OBS isn’t detecting your mic or desktop audio, check your Windows sound settings. Sometimes the wrong device is set as the default and OBS just follows that.
Step 4: Set Video Resolution and FPS for Streaming
Your video settings determine how sharp and smooth your stream looks. The goal is to match OBS to your monitor or gameplay resolution without overloading your system.
- Open Settings → Video.
- Adjust the following options:
| Setting | Recommended Value | Notes |
|---|---|---|
| Base (Canvas) Resolution | 1920 × 1080 | Match your monitor/game resolution. |
| Output (Scaled) Resolution | 1920 × 1080 (or drop to 1280 × 720 if your internet upload speed is limited) | Affects what viewers actually see. |
| Downscale Filter | Lanczos (best quality) | Produces the sharpest scaling. |
| Common FPS Values | 60 FPS | Smooth motion (use 30 FPS if bandwidth or CPU is limited). |
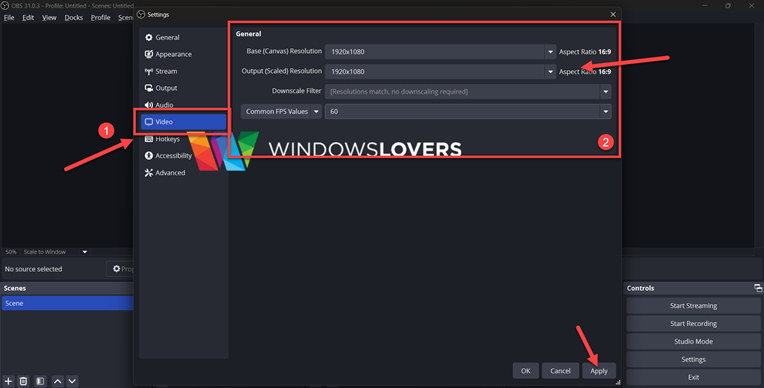
🎮 Gaming tip: If you’re playing at 1080p, set both Base and Output resolution to 1920 × 1080 for the cleanest quality.
Want to share your settings or troubleshoot with screenshots? Here’s how to take a screenshot on Windows 11 or 10.
Once you’ve set everything, click Apply to lock it in.
Step 5: Advanced Network Settings in OBS (Stream Stability)
The last step in your streaming setup is making sure your stream stays stable, even if your internet connection has hiccups.
- Go to Settings → Advanced.
- Under the Network section, turn on Automatically Reconnect. If your internet drops for a few seconds, OBS will try to recover your stream without you needing to restart it.
- Look for “Dynamically change bitrate to manage congestion.”
- ✅ Enable this if you’re on Wi-Fi or share your connection (like when someone else is watching 4K Netflix in the same house). OBS will lower your bitrate temporarily to keep your stream online.
- ❌ Disable this if you’re on a fast, stable wired connection — you’ll get more consistent quality.
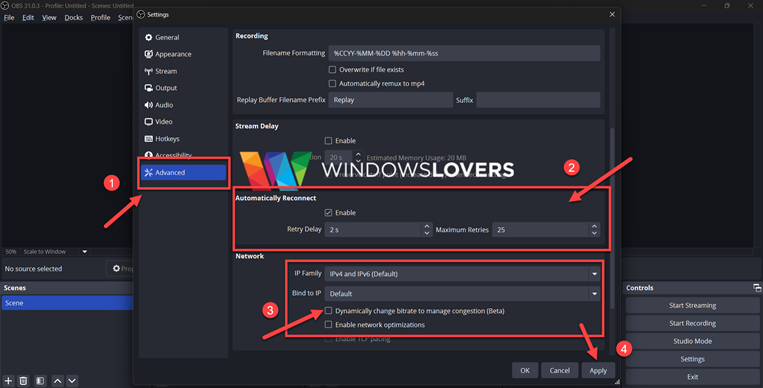
When you’re done, click Apply to save changes.
✅ That’s it — your OBS streaming setup is complete. You’re ready to go live with great quality and reliable performance.
OBS Studio Recording Setup on Windows (High-Quality Local Recording)
If you’re not streaming and just want to capture gameplay, tutorials, or your screen in top quality, OBS handles that brilliantly. The recording setup is a little different from streaming: we’ll use a safer file format to avoid corruption, pick the right encoder for your PC, use CQP for consistent quality, and set clean audio tracks so editing is easier.
Let’s walk through the full OBS recording setup step by step.
Step 1: Output Settings for Recording in OBS (MKV vs MP4)
First, we need to tell OBS where and how to save your recordings. By default, OBS saves to a generic location, but it’s worth customizing this so you avoid performance hiccups and corrupted files.
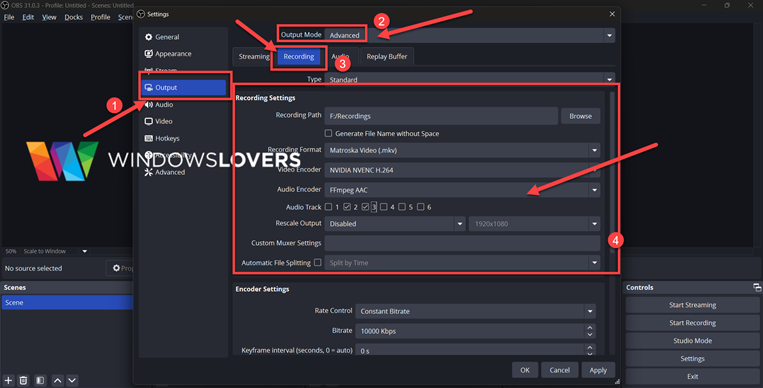
- Open Settings → Output.
- Change Output Mode from Simple to Advanced.
- Select the Recording tab.
Now adjust these options:
- Recording Path: Pick a folder on your SSD if you have one. Recording to a regular hard drive can sometimes cause stuttering or dropped frames. Not sure why SSDs matter? Check our guide on why SSDs are better for gaming and heavy workloads — the same benefits apply to smooth screen recording.
- Recording Format: Choose MKV. Unlike MP4, MKV won’t corrupt the entire file if OBS or your PC crashes mid-recording.
- Automatically Remux to MP4: Found under the Advanced tab (left sidebar). Enabling this means OBS will instantly create an MP4 copy after recording finishes, while still giving you the crash safety of MKV. You can safely delete the MKV file later if you don’t need it.
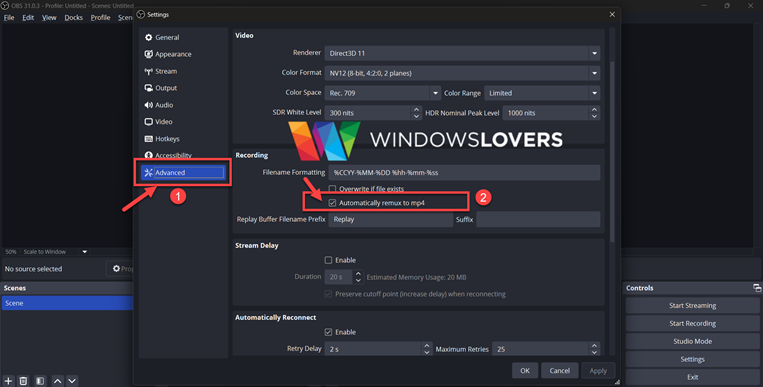
⚠️ Quick note: MP4 seems convenient, but it’s risky. One crash can ruin the whole file. MKV + automatic remux gives you the best of both worlds.
When you’ve finished setting this up, click Apply.
Step 2: Best OBS Encoder Settings for Recording Gameplay & Tutorials
The encoder is what actually compresses and saves your video. Picking the right one makes a big difference in quality and performance.
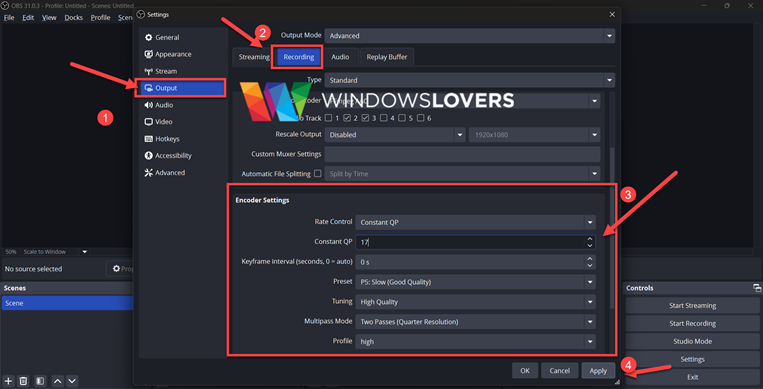
- While still in the Recording tab (under Output), adjust these options:
- Audio Track: If you’re editing later, select more than one. This way, your mic and game sound are on separate tracks and easier to balance.
- Encoder:
- If you have an NVIDIA GPU, select NVENC H.264 — it’s fast and efficient.
- On AMD, choose the AMD option.
- If you don’t have a dedicated graphics card, use x264 (CPU-based), but keep in mind this uses more system resources.

Recommended Encoder Settings for Recording
| Setting | Recommended Value | Notes |
|---|---|---|
| Rate Control | CQP | Best for recording — keeps quality consistent. |
| CQ Level | 17 (range 16–20) | Lower = higher quality, but bigger files. |
| Keyframe Interval | 2 | Standard setting for video editing compatibility. |
| Preset | P6 | P7 = max quality (heavier on PC), P5 = more performance. |
| Tuning | High Quality | Balances sharpness with stability. |
| Multipass Mode | Two Passes (Quarter Resolution) | Cleaner compression. |
| Profile | High | Ensures wide compatibility. |
| B-Frames | 2 | Standard for smooth playback. |
| Adaptive Quantization | Enabled | Helps maintain detail in complex scenes. |
🎥 Tip: If your PC starts to lag, don’t stress. Try bumping the CQ level to 19 or 20, or lower the Preset to P5. You’ll sacrifice a little quality but keep recordings smooth.
When you’re done, click Apply to save your changes.
Step 3: Best OBS Audio Settings for Recording on Windows
Bad audio can ruin even the best-looking video — nobody sticks around if your voice sounds muffled or your game audio drowns everything out. Let’s fix that.
- Open Settings → Output → Audio.
- For each track, set the Audio Bitrate to 320 Kbps. This gives you clean, detailed sound without bloating your file size.
Now head over to the Audio tab:
- Desktop Audio → Choose the device you normally hear sound from (your speakers or headphones).
- Mic/Auxiliary Audio → Pick the microphone you’ll be talking into. (For example: Blue Yeti, HyperX QuadCast, or FANTECH CAPTAIN 7.1).
When that’s set, hit Apply.
🎧 Pro Move: If you’re planning to edit later, record your mic and desktop audio on separate tracks. Trust me, future-you will thank you — it makes editing way easier. You can lower the game volume, mute background noise, or boost your voice without messing up everything else.
And if your mic, webcam, or capture card isn’t showing up at all, try these fixes for USB device not recognized errors in Windows.
Step 4: Video Resolution and FPS Settings for Recording
The last step is setting your resolution and frame rate. This basically tells OBS what quality to record in, and it’s best to match it to your monitor unless you have a specific reason to scale it down.
- Open Settings → Video.
- Apply these settings:
| Setting | Recommended Value |
|---|---|
| Base (Canvas) Resolution | Match your monitor (e.g., 1920 × 1080) |
| Output (Scaled) Resolution | Same as base (for full quality) |
| Downscale Filter | Lanczos (sharpest scaling) |
| Common FPS Values | 60 FPS (or 30 FPS if you’re recording tutorials or want smaller files) |
Once done, click Apply to save.
🖥️ Note: If you’re short on storage or don’t need super high quality, you can drop the resolution to 1280 × 720 or use 30 FPS. It’s a simple way to keep file sizes down.
That’s It — OBS Studio Recording Setup is Complete 🎉
And that’s all you need to get started! You’re now ready to record high-quality videos with OBS Studio. Whether it’s gameplay, tutorials, lectures, or just your screen, this setup will give you both stability and great results.
🎬 Next Steps: Once you’re comfortable, play around with Scenes and Sources in OBS. This is where you can add overlays, webcams, or extra audio sources to personalize your recordings and make them look more professional.
Want OBS to launch automatically when you log in? Here’s how to use the Windows 10 Startup folder.
OBS Studio FAQ (Windows 11 & 10)
It depends on where you’re streaming. For Twitch, the maximum is 6000 Kbps, so set your bitrate around that for 1080p/60fps. YouTube lets you go higher — 8000–10,000 Kbps is a sweet spot for most people. If your internet upload speed is slow, drop to 4500–5000 Kbps for stability.
Yes, and it works really well if your PC can handle it. You’ll need to set up a separate recording profile in OBS, so you can use different quality settings for recording and streaming. Just remember: this does use extra CPU/GPU power, so test first to make sure your PC stays smooth.
Lag usually comes from one of three things:
Internet upload speed can’t keep up with your bitrate.
Encoder overload (your CPU/GPU is maxed out).
Background apps hogging resources.
Quick fix → Try lowering your bitrate, switching to NVENC if you’re on NVIDIA, and close anything heavy running in the background.
OBS Studio is lighter, free of bloat, and has more flexibility. Streamlabs is easier to use out of the box but uses more resources and can feel sluggish on mid-range PCs. If you’re just starting, I recommend OBS Studio — you’ll learn more and have better performance.
Double-check two things:
In OBS Settings → Audio, make sure your mic and speakers/headphones are selected.
In Windows sound settings, confirm your default devices are correct.
A quick test is to watch the audio mixer in OBS — if the green bars aren’t moving, it’s not hearing anything from that source.
If you’re on a budget laptop or an older PC, keep things light:
Set your Output Resolution to 1280 × 720 instead of 1080p.
Lower your FPS to 30 for smoother performance.
Use the x264 encoder with a faster preset, or NVENC if you have an NVIDIA GPU.
You’ll lose a little sharpness, but your stream or recording will stay smooth and watchable — which matters more than raw resolution.
Yes, OBS Studio works perfectly on both Windows 11 and Windows 10. Just make sure you’re running the 64-bit version of Windows (OBS doesn’t support 32-bit). If you run into errors while installing on Windows 11, they’re usually related to missing Visual C++ runtime files — a quick install from Microsoft fixes it.

How To Install Scoop on Windows 11 & 10 (Step-by-Step Guide)
How To Install & Setup Django Framework In Windows 10
Finally, Microsoft Flight Simulator 2020 Available in VR
List Of Windows 10 Compatible Games
How Does WinRAR Make Money