Are you looking for installing and setting up the Django framework to complete various web projects in Windows 10? When it comes to addressing the needs of various web development projects, Django becomes the easy choice for many users.
People who don’t know anything about Django presume it’s just a content management scheme. It’s a piece of software that allows you to create and run web applications. Django is used by many of the most popular websites on the Internet, including Instagram, Facebook, Pinterest, Mozilla, Reddit, Dropbox, Spotify, etc.
In this article, I will help you install and set up the Django framework for the first time. This will be the beginner’s guide for the users facing problems in installing and running the Django project in their Windows. If you would like to know how to install MySQL on macOS, we’ve got a guide for that as well.
Django: Windows 10 Download And Installation Guide
Django is an open-source back-end web application architecture built on Python, one of the most common web development languages. It’s a solid and approachable structure that lets you concentrate on your application by pre-baking main components that are standard practice.
Since it was developed to help developers get applications from idea to execution as soon as possible, it’s known as “the web interface for Perfectionists on a deadline.” Anyone familiar with the Python programming language and its syntax should begin a project using the Django web platform to construct a web application.
Things that we will be doing
To install Django, we will go through the following things.
- Download python
- Add path
- Install Python
- Check Django and pip version
- Install virtualenv and virtualenvwrapper
- Install Django
- Create your first project
How to install Django Framework
After knowing what Django is and the various processes that we have to go through now, we’ll teach you how to install and set up a Django development environment on Windows 10.
Install Python
The very first thing you have to do is to install Python. The process mentioned in this article will work for Windows 7, Windows 8, and Windows 10. The steps for installing Python are given below.
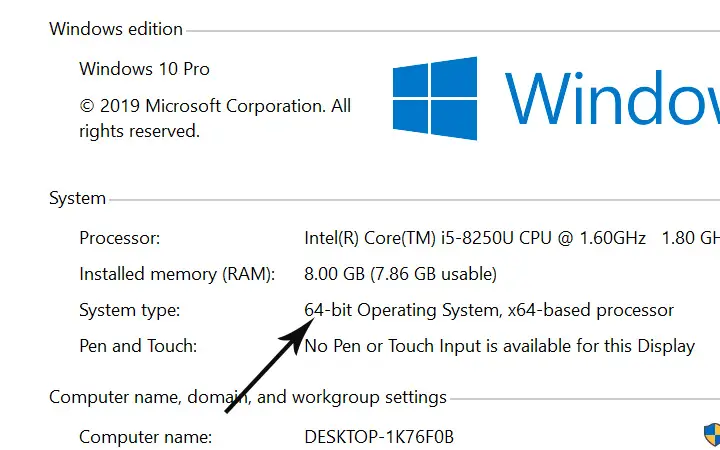
Step 1: Before installing Python, check your OS (64 bit or 32 bit). To check your operating system right-click on the ‘My Computer’ icon and then click on the ‘Properties’ option.
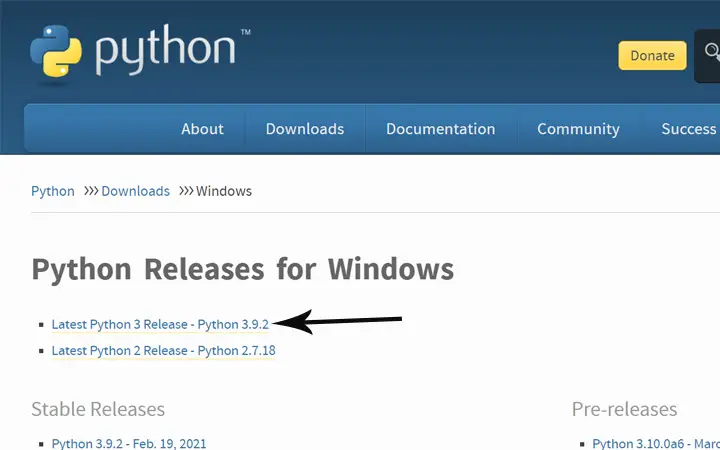
Step 2: After knowing your system, type open your web browser, and then in the search box, look for python.org.
Step 3: After opening the python page, there you will see python releases for Windows. In that section, click on ‘Latest Python 3 Release-Python 3.9.2 ‘.
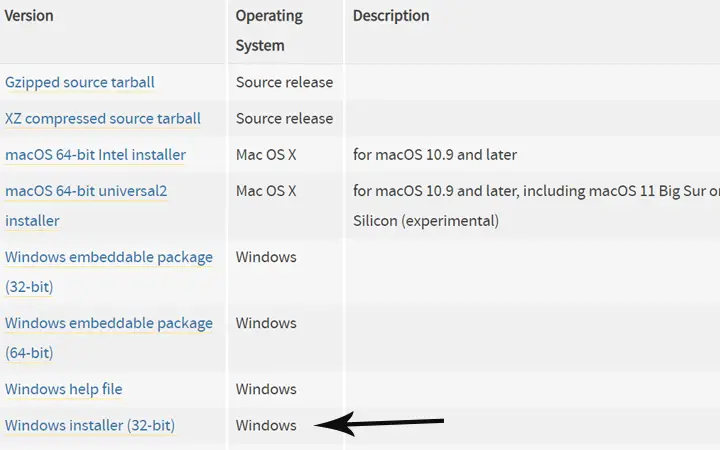
Step 4: Now scroll a little bit, and in the ‘Files’ section, you will see various device compatibility lists as I am using 64-bit, so I will choose the Windows installer (64-bit).
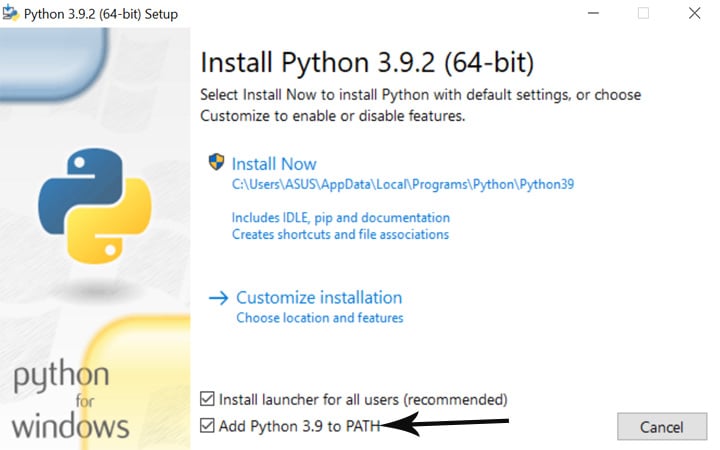
Step 5: It will just take a few seconds for the download to complete. Once your download is completed, open the setup file.
Step 6: On the setup page, before clicking on the ‘Install Now’ button, make sure to tick on the ‘Add Python 3.9 to PATH’ option, located at the bottom part of the setup Windows. After that, you can click on the ‘Install Now’ button.
Step 7: The installation will also take a few seconds. Once your installation is completed, you can check your python version through the command prompt.
To see whether is Python is installed successfully or not, open the command prompt. There type ‘ Python –version’ and know the pip version again type ‘pip –version.’
Now we will configure the environment for Django and then install our Django. So, let’s see how we can do that.
Install Virtual Environment
The preferred approach to building Django applications is to use a virtual environment in Python, an isolated running copy of Python that builds a virtual environment for your Python instances. Follow the following steps to set the virtual environment.
Step 1: In Windows, go to the search and then look for ‘Windows Powershell.’
Step 2: Right-click on Windows Powershell and then click on the ‘Run as Administrator’ option.
Step 3: Now, type the following commands in PowerShell one by one.
- pip install virtualenvwrapper-win
- mkvirtualenv myproject
- workon myproject
These are the three command lines that you have to write in your Powershell. After that, your virtual environment will be all set.
Install Django
We are now at the final stage. Here we will install Django using pip. So, to begin the installation, type the following command in the same PowerShell.
- Pip install django
After entering this command and pressing the enter button, your Django will be installed in your system. To verify and check the Django version, you can use the following command.
- python -m django –version
Now you are all set. You can start creating your project. Here is how you can create your very first Django project. Just use the following steps to create your project.
Step 1: In your PowerShell, first, you have to the C directive. For that type ‘cd\’.
Step 2: After going in C directive, now type ‘mkdir abc’ and press enter. Here ‘abc’ is my folder name. You can use any name in place of abc.
Step 3: Your folder is created. Now type ‘cd .\abc\’ and press enter. This command will open your folder.
Step 4: Inside the folder to create your project, type ‘django-admin startproject mysite’ and press enter. This will create your project.
Step 5: To run the project, first go to your project. For that type’ cd.\mysite\’ and press enter. After that, again type ‘python manage.py runserver’ and press enter.
That’s it, now after running the project, you will get an URL. Copy that URL and then paste that URL into google chrome. Your project will be displayed.
Why use Django Framework?
- Fast and Simple- With the help of Django, you can easily solve various web-related problems. That’s why Python used in Django is one of the most likable programming languages in this world. With this platform, developers can work on more than one version at a time without having to restart the whole schedule.
- Easy to Use- The Django platform is commonly used because it is free and open-source, with a vast group of developers developing and maintaining it. It means that we can use Google to discover solutions to our problems quickly. Because of this, it gets even more easier to learn and use Django.
- Good for SEO- Python is known for its human-readable language, which helps your website show high in search results. With Django, you can build readable website URLs and links by incorporating the most appropriate keywords and SEO best practices.
- It Suits any Web Application Project- You can work on projects of any scale and scope with Django, whether it’s a small website or a high-volume web application. It supports most big databases and encourages you to use a database that is the best fit for a specific project or even several databases at once.
Summing Up
With this now, you are all set with your Django framework in your system. After reading how to install Django and start your first project with it, I hope you have a clear understanding of the framework. Thank you for reading, and please leave us some suggestions in the comment section below to do better in upcoming posts.
PS C:\python_web\v1> pip install django
Requirement already satisfied: django in c:\programm files\python.3.9_3.9.2032.0_x64\lib\site-packages (3.2.8)
Requirement already satisfied: sqlparse>=0.2.2 in c:\programm files\python.3.9_3.9.2032.0_x64\lib\site-packages (from django) (0.4.2)
Requirement already satisfied: asgiref=3.3.2 in c:\programm files\python.3.9_3.9.2032.0_x64\lib\site-packages (from django) (3.4.1)
Requirement already satisfied: pytz in c:\programm files\python.3.9_3.9.2032.0_x64\lib\site-packages (from django) (2021.3)
PS C:\python_web\v1> python django –version
C:\Program Files\Inkscape\bin\python.exe: can’t open file ‘django’: [Errno 2] No such file or directory
PS C:\python_web\v1> python -m django –version
C:\Program Files\Inkscape\bin\python.exe: No module named django
PS C:\python_web\v1> cd .\mysite
PS C:\python_web\v1\mysite> python -m django –version
C:\Program Files\Inkscape\bin\python.exe: No module named django
PS C:\python_web\v1\mysite> mkvirtualenv myproject
ERROR: virtualenv “myproject” already exists
PS C:\python_web\v1\mysite> python manage.py runserver
Traceback (most recent call last):
File “manage.py”, line 11, in main
from django.core.management import execute_from_command_line
ModuleNotFoundError: No module named ‘django’
The above exception was the direct cause of the following exception:
Traceback (most recent call last):
File “manage.py”, line 22, in
main()
File “manage.py”, line 13, in main
raise ImportError(
ImportError: Couldn’t import Django. Are you sure it’s installed and available on your PYTHONPATH environment variable? Did you forget to activate a virtual environment?
PS C:\python_web\v1\mysite>
i have install django following all the above procedures but i have failed to run my first project, “mysite”!!
it was showing me this error;
“the term ‘cd.\mysite’ is not recognised as the name of a cmdlet, function, scriptfile or operable program. check the speling of the name or if the path was included , verify that the path is correct and try again”
categoryInfo: commandNot found Exception.
put a space between cd and dot.
cd .\mysite
^
Thank you for helping out!