Making any changes with your Windows Bios is risky, but sometimes, you need to make some necessary changes to make sure your system performs at its best. Many people don’t know how to update bios in Windows 10. Updating bios is not a hard job if you follow the right way.
BIOS is a software program that works in conjunction with the motherboard of a computer. This software is embedded in the motherboard of your computer and regulates everything from the boot sequence of your disks to preboot security choices to whether the Fn key on your keyboard engages a function key or a media control.
Do You Really Need To Constantly Update Your BIOS?
It is not required to update the BIOS if you are not upgrading your hardware or if you are not experiencing any specific issues. Even though some BIOS updates do promise better performance, stability, or overall performance boost on your Windows systems, those updates are quite rare. You’re better off leaving the current BIOS alone unless it comes with security patches, support for new hardware you plan to utilize, or addresses an issue that’s been bothering your everyday usage.
However, if you feel the necessity of updating BIOS in Windows, then don’t worry. This article will have a detailed look at the step-wise process for how to update bios in Windows 10.
How To Check BIOS Version In Windows 10?
Whether your computer has a BIOS, it’s a good idea to examine what version is presently installed to determine if you need to install a new update to improve the device’s functioning. To check the bios version in Windows 10, follow the following steps.
Step 1: Go to the Windows search box and then search for ‘System Information.’
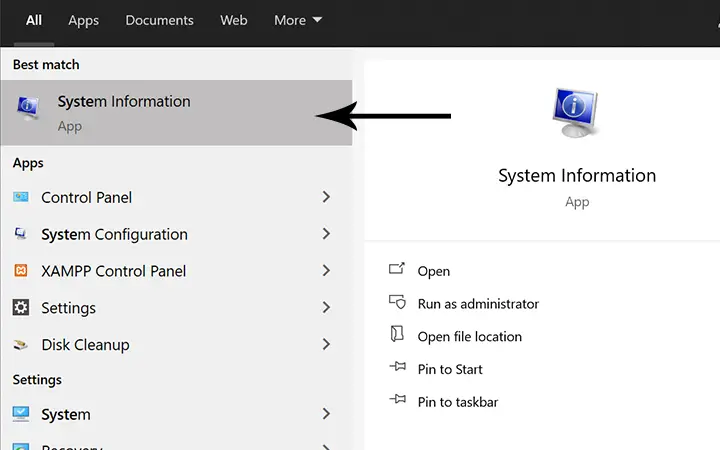
Step 2: Under the system summary, you will be able to see the bios installation date. Look for the BIOS Version/ Date in the right side box, and there you will see the version name and the date when it was installed in your system.

You can also use the command prompt to see the bios version. For that, open your command prompt as an administrator, and in the command prompt, run this command line ‘wmic bios get smbiosbiosversion’ and hit the enter key.
Now head over to your laptop/pc manufacturer’s website and check for the version of the latest update available on the website. It is highly recommended that you do not jump on the latest UEFI drivers as there might be instability or compatibility issues. So, only proceed if you are sure what you are getting yourself into with the next update.
Please note that different manufacturers have different processes or options when it comes to their products. Even though the options might be different the core outcome of the guidelines mentioned should help you get the job done. If you have any questions or are facing issues, please leave a comment down below and I will get back to you with answers if I am able to.
There are three ways you can update BIOS in Windows 10 or any other OS for that matter.
- Using BIOS update utility within Windows GUI
- With a USB flash drive with the latest BIOS utility software loaded
- Downloading and installing the latest update directly from the support website
1. Updating The BIOS With A Update Utility Within Windows GUI
I would personally suggest you always avert from these options as much as possible. It’s like having open-heart surgery while playing tennis. Well, not exactly but you get the point :D.
Almost all major manufactures provide a BIOS update utility for their product. I have used it in the past but mostly on a test system. Updating BIOS is way more important and critical than updating/installing a fresh copy of Windows. If the BIOS update process is halted or affected in any way, your motherboard might be bricked. As it’s not as simple as uninstalling other applications from your Windows 10 PC.
Your computer might have antivirus software or any other applications that might interfere with the BIOS update utility and before you know it your system might be completely unfunctional.
So always look for other options that updating your BIOS from within Windows OS GUI itself.
2. Installing Latest BIOS Update Directly From BIOS Using Internet Connection
This option also should be used with caution but is a bit safer than using a BIOS update utility within Windows.
In this process, you need to boot into the BIOS (follow the steps mentioned below) and then select the internet connection option to install the latest BIOS on your system. If WiFi is your primary connection, you most probably will need a LAN cable and physically connect your computer to the modem/router.
If you want to learn how to get into BIOS in Windows 10, follow the steps below.
How To Update BIOS In Windows 10?
You can update bios in Windows 10 using the USB drive. For that, you have to download the installable file on your USB drive. For that, first, check the previous version of your BIOS and then search the latest BIOS from google. While choosing the bios file, make sure that your system supports the file that you download.
Once your bootable USB flash drive is ready, then first enter into the BIOS of your system. For that, follow the following steps.
Step 1: Go to your Windows search box and there type ‘Setting.’
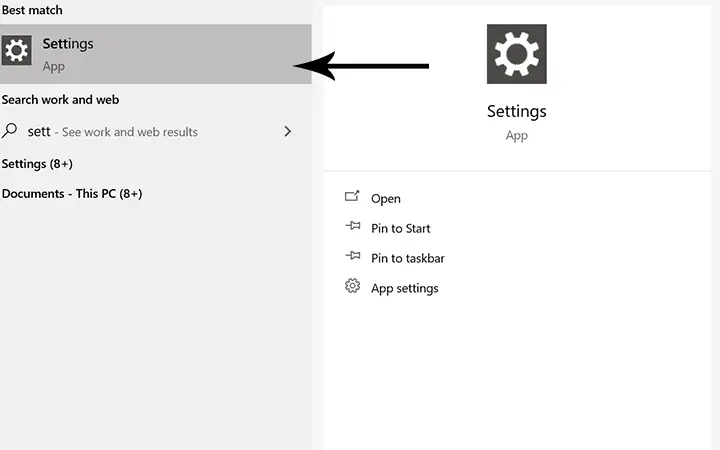
Step 2: Click on the Settings option and then click on the ‘Update and Security’ option.
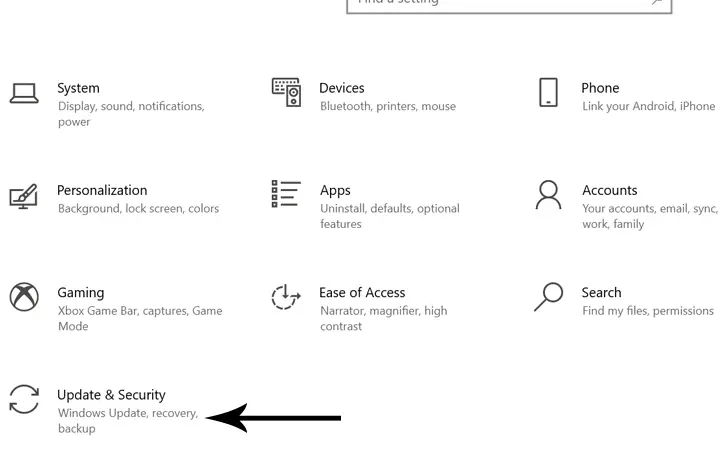
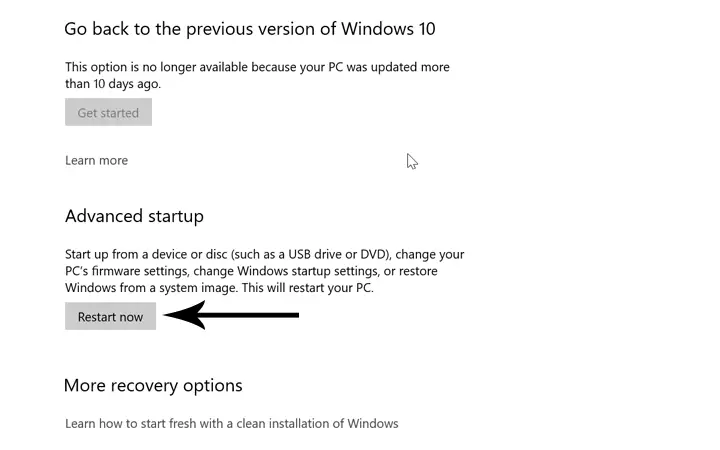
Step 3: From the left side menu of the ‘Update and Security tab, click on the ‘Recovery’ option.
Step 4: Under the advanced startup, click on the ‘Restart’ option to open the special menu of the system.
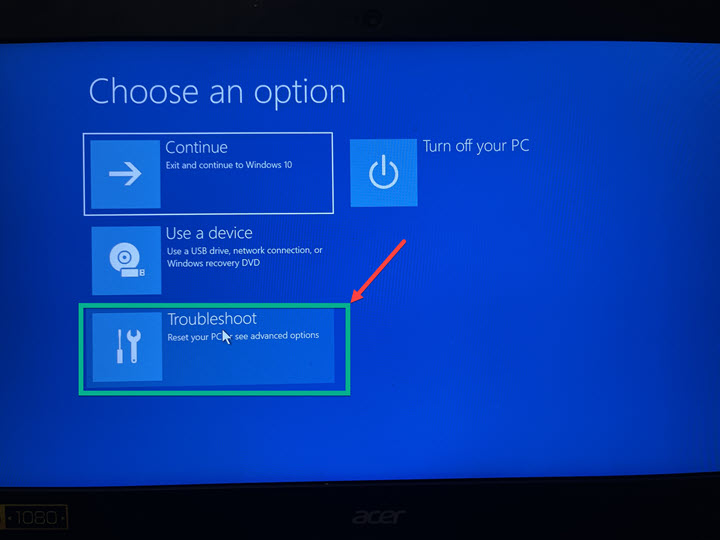
Step 5: After your system reboots and shows you the special menu, then select the ‘Troubleshoot’ option from that menu.
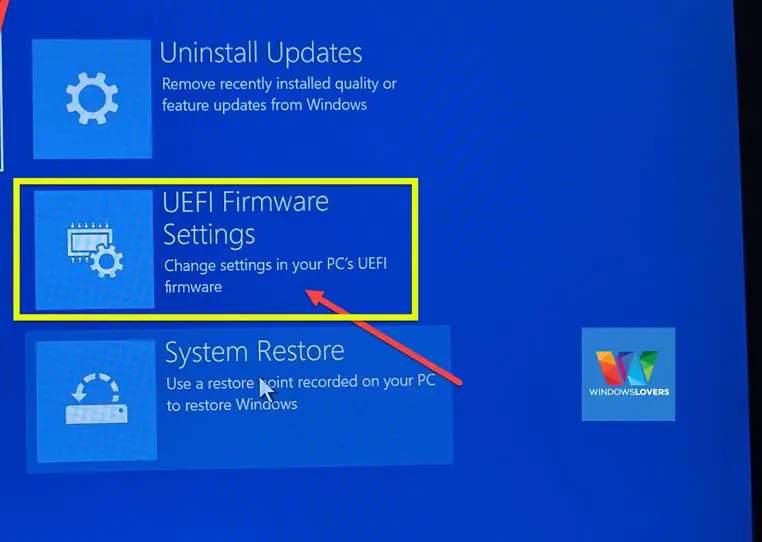
Step 6: Now click on the ‘Advanced option’ and then select the ‘UEFI Firmware Settings.’ After clicking, you will see a restart button. So, click on that button and then enter the BIOS mode of your system.
The alternative way to enter the BIOS mode directly is to restart your system, and while your system is restarting, then continuously press the 'F2' button (This varies depending upon the motherboard you have). Once you have entered the BIOS mode, follow the following steps to install the latest bios version in your Windows 10.
Below mentioned options are subjective to a specific motherboard and may not apply to your system. Please visit your manufacturer's website if that is the case.
Step 1: Once you are in BIOS mode, click on the boot option.
Step 2: You will see two options (Launch CSM and Launch PXE). Make sure that both options are enabled.
Step 3: Once you are done checking the boot configuration, click on the ‘Advanced’ option and then select the ‘Start Easy Flash’ option.
Step 4: While doing all this process, make sure that your USB drive is plugged into your system. Once you click on the start easy flash, your system will look for the BIOS file from your USB drive.
Step 5: After locating the BIOS from your USB drive, it will be displayed on your screen. Now select the BIOS model, and then a popup will appear asking you whether you are sure to update your BIOS or not. Simply select the yes option and then let the system install the new bios.
Note: If you interrupt the installation process, this action may affect your motherboard. So, to make sure nothing goes wrong, let the whole process finish by itself.
Step 6: Once the installation and verification process is completed, your PC will shut down by itself. Now the BIOS is successfully installed, you can now check your BIOS version to verify the BIOS update process.
Conclusion
I hope you have understood the process of the BIOS update. It is always a good idea to keep your windows up to date and upgrade as necessary. Updating the BIOS is not a hard job, but you need to be careful while making some changes with your BIOS, as it will directly affect your motherboard. If you are uncertain about the process, it’s always good to take your PC to the nearest service center to get the work done. If you are still confused with some of the steps mentioned in this article, let us know in the comment section.