If you’ve ever tried downloading software on Windows 11 (or even on Windows 10), you already know how frustrating it can be. First, you open your browser and search for the application you want. Then you have to make sure you’ve actually landed on the official website and not some random mirror. After that, you download the installer setup file, double-click it, and click through a long series of “Next” buttons. On top of that, you’re often forced to decline optional add-ons or third-party programs that sneak into the installer. Finally, after all of that, the installation completes—only for some applications to insist on a system restart before you can even use them.
Now imagine skipping every single one of those steps.
What if installing software on Windows 11 or Windows 10 was as easy as opening PowerShell, typing a single command, and pressing Enter? That’s exactly what Scoop makes possible.
Scoop is a lightweight Windows package manager that runs from the command line. It takes the pain out of installing and managing applications by automating the entire process. With Scoop, you can:
- Install apps with one command.
- Update apps without downloading new installers.
- Uninstall apps cleanly with a single command.
For many users—whether you’re a developer, IT pro, or just someone who’s tired of messy installs—Scoop is a real game changer. Here’s why people switch to it:
- No administrator rights needed: apps are installed in your user folder.
- Developer-friendly workflow: clean, fast, and easy to update.
- No need to manually set environment paths or variables.
In short, when you install Scoop on Windows 11 or Windows 10, you turn hours of manual downloads and installs into a few simple commands.
How to Install Scoop on Windows 11 & Windows 10
Installing Scoop is quick and only takes a couple of commands in PowerShell. The steps are the same whether you’re using Windows 11 or Windows 10.
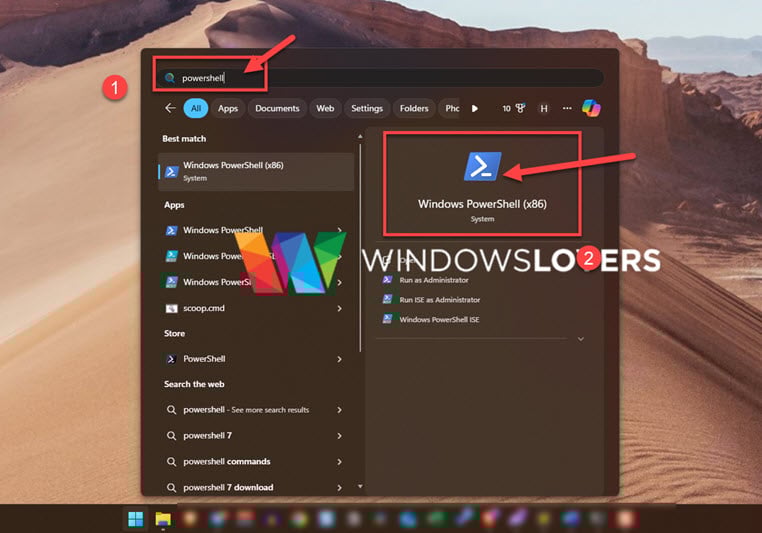
Step 1: Open PowerShell
- Make sure you’re using PowerShell 5.1 or later.
- You don’t need to run it as Administrator—Scoop installs everything inside your user folder.
If you do hit permissions-related prompts for specific tasks, here’s a quick refresher on how to run a program as administrator in Windows—it applies to PowerShell too.
Step 2: Set the execution policy
Before installing Scoop, you need to allow PowerShell to run remote scripts. Copy and run this command:
Set-ExecutionPolicy -ExecutionPolicy RemoteSigned -Scope CurrentUser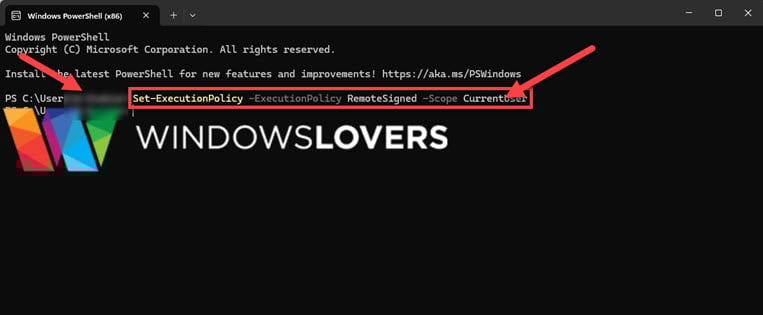
Step 3: Run the Scoop installer
Now install Scoop by running:
Invoke-RestMethod -Uri https://get.scoop.sh | Invoke-Expression
Step 4: Verify the installation
Once it finishes, Scoop will be ready to use. You can test it by typing:
scoop helpIf the command works, congratulations—you’ve successfully installed Scoop on your Windows 11 or Windows 10 system.
Troubleshooting Scoop Installation on Windows
Most installations of Scoop on Windows 11 or Windows 10 go smoothly, but if you run into issues, here are some quick fixes:
- “Scoop is not recognized as a command”
This usually happens if PowerShell hasn’t refreshed your PATH. Close and reopen PowerShell, then try again. - Execution policy error
If you see a warning about scripts being disabled, make sure you’ve run:Set-ExecutionPolicy -ExecutionPolicy RemoteSigned -Scope CurrentUser - Installer stuck on 7-Zip
Scoop needs 7-Zip for unpacking files. If the installer freezes here, manually install 7-Zip first, then re-run the Scoop command. - Network or permission errors
Check that your firewall or antivirus isn’t blocking PowerShell. Also confirm you’re running PowerShell 5.1 or later, which is required on both Windows 11 and 10. If downloads are failing or scripts can’t reach Scoop’s servers, work through these ERR_CONNECTION_REFUSED fixes to rule out local network or security software blocks.
💡 Most errors come from either execution policies or PATH not refreshing—both are easy to fix by following the steps above.
Common Scoop Commands in PowerShell
Once you’ve installed Scoop, managing software becomes much easier. Here are some of the most common commands you’ll use:
1. Install an App
scoop install <app-name>Example:
scoop install git💡 Note: If it’s your first time installing something, Scoop may also download 7-Zip automatically since it’s required to unpack files.
2. Uninstall an App
scoop uninstall <app-name>Example:
scoop uninstall gitThis cleanly removes the application without leaving behind extra files.
Removing something you didn’t install via Scoop? This walkthrough of using revo uninstaller on windows to remove apps shall help.
3. Update Scoop
scoop updateThis command refreshes Scoop itself. Behind the scenes, Scoop removes and re-adds the main bucket (its core app directory) to ensure everything is up to date.
4. Update All Installed Apps
scoop update *This updates all apps you’ve installed with Scoop to their latest versions.
If you’re unsure which apps need updating, you can check by running:
scoop status5. List Installed Apps
scoop listThis shows you all the apps currently installed through Scoop.
👉 This covers the basic Scoop commands you’ll use every day.
Quick Scoop Command Cheat Sheet
| Command | What It Does | Example |
|---|---|---|
scoop install <app-name> | Installs an application | scoop install git |
scoop uninstall <app-name> | Removes/uninstalls an application | scoop uninstall git |
scoop update | Updates Scoop itself | scoop update |
scoop update * | Updates all installed applications | scoop update * |
scoop status | Shows apps that need updates | scoop status |
scoop list | Lists all installed applications | scoop list |
Prefer the command line for Windows features too? Here’s a practical guide to installing RSAT on Windows 10 using PowerShell, which is a nice companion to a Scoop-first workflow.
Buckets in Scoop Explained
When you install apps with Scoop, it needs to know where to find them and how to set them up. That’s where buckets come in.
Think of buckets as collections of app recipes. Each bucket contains instructions that tell Scoop:
- Where to download the app.
- How to install it.
- How to configure it properly.
The bucket itself doesn’t store the app—it just gives Scoop the directions.
Default Scoop Buckets
By default, Scoop installs with the main bucket. This contains core CLI tools and popular developer utilities.
Other commonly used buckets include:
- extras → GUI desktop apps like editors, browsers, and media tools.
- versions → Alternate versions of apps (great for developers who need different releases of the same tool).
Managing Buckets in Scoop
Here are some handy bucket commands in PowerShell:
- Add a bucket
scoop bucket add <bucket-name>Example:scoop bucket add extras - List your buckets
scoop bucket list - Remove a bucket
scoop bucket rm <bucket-name>
Removing a bucket does not uninstall any apps you already installed from it. Those apps will continue to work normally.
Popular Buckets to Explore
- main → Core command-line tools and utilities.
- extras → GUI apps like VS Code, browsers, and media players.
- versions → Alternative versions of programming languages and tools.
For a full list, check the official Scoop Wiki: Buckets Overview.
With buckets, Scoop becomes extremely flexible—you’re not limited to one app source, and you can mix and match based on your needs on Windows 11 or Windows 10.
Scoop: Switch Between Versions of the Same Tool
One of Scoop’s most powerful features is the ability to switch between different versions of the same software. This is especially useful for programming languages, frameworks, or developer tools where different projects may require different versions.
If you’re a developer working across multiple environments, this feature will save you time and headaches. Once you set it up, switching versions is as easy as running a single command.
Steps to Switch Between Versions
Step 1: Open PowerShell
Just open PowerShell normally (no need for admin mode).
Step 2: Add the versions bucket
If you haven’t already added it, run:
scoop bucket add versions
This will give you access to alternate versions of software.
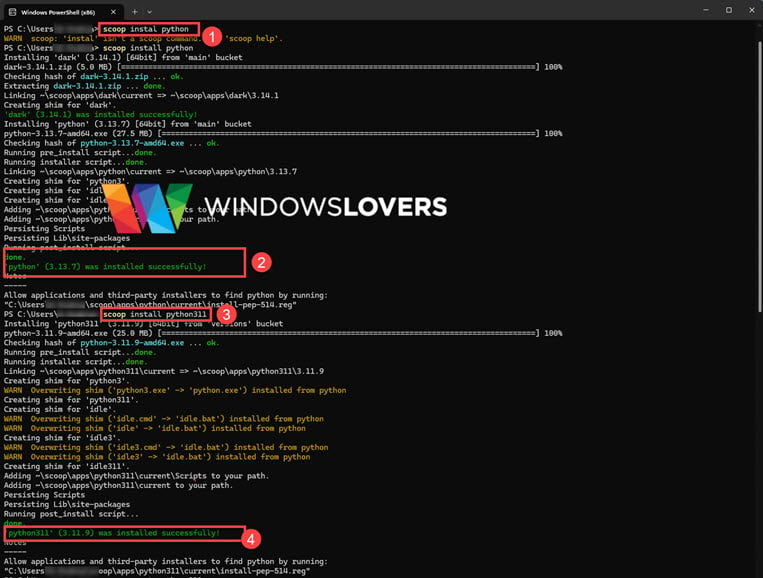
Example 1: Switching Between Python Versions
For example, let’s say you want two different versions of Python installed:
scoop install python
scoop install python311- The main
pythonpackage will come from the main bucket. - The
python311package (or any other version) comes from the versions bucket.
Use the reset command to switch:
scoop reset python311You can confirm the active version by running:
python --version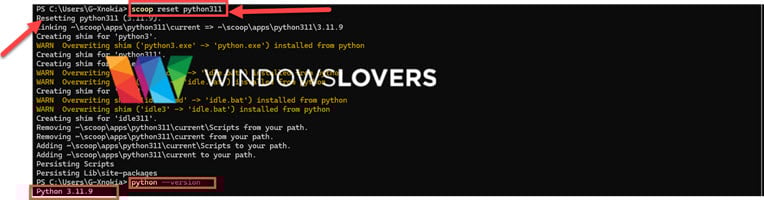
And that’s it — you’ve switched to the version you need.
If you maintain machines remotely, this setup guide for Remote Desktop on Windows 11 Home pairs well with a Scoop-based toolchain.
Example 2: Switching Between Node.js Versions on Windows 11 & 10
Node.js is another tool where version control is critical, since different projects may require different Node versions.
Install two different versions:
scoop install nodejs
scoop install nodejs18
Switch between them:
scoop reset nodejs18Check the active version:
node -vImportant Note on Buckets
It’s easy to assume you’re “inside” a specific bucket when working with Scoop, but that’s not how it works. Scoop doesn’t operate in bucket modes. Instead, whenever you install an app, Scoop checks the buckets you’ve added (main, extras, versions, etc.) and installs the package from the highest-priority match.
With Scoop, switching versions of tools like Python or Node.js on Windows 11 or Windows 10 becomes effortless—no manual uninstalling, no PATH editing, just one command.
Scoop makes Windows app management simple: one command to install, update, or switch versions—no admin prompts, no PATH hassle. Whether you’re on Windows 11 or 10, it’s an everyday productivity boost.
Frequently Asked Questions
No. Scoop installs everything inside your user profile folder, so you don’t need administrator rights. This makes it safer and more convenient for everyday use.
It depends on your needs:
Scoop is lightweight, developer-friendly, and great for quickly installing CLI tools and managing multiple versions.
Chocolatey is broader, supports system-wide installs, and often requires admin rights.
Winget (Microsoft’s package manager) is improving fast but doesn’t yet have the flexibility of Scoop’s buckets.
Many developers use Scoop alongside one of the others depending on the situation.
If you see “Scoop is not recognized as a command,” it usually means your PowerShell session hasn’t refreshed the PATH. Simply close PowerShell and reopen it. If the error persists, double-check that Scoop is installed in: C:\Users\<YourUsername>\scoop
Yes. Scoop isn’t limited to CLI tools. If you add the extras bucket, you can install popular desktop apps such as Visual Studio Code, Firefox, VLC, and more.
Yes. Scoop’s versions bucket lets you install and switch between different versions of tools like Python and Node.js. This is one of Scoop’s most popular features for developers.

OBS Studio Setup for Windows 11 & 10 – Install, Stream & Record
How To Install & Setup Django Framework In Windows 10
Finally, Microsoft Flight Simulator 2020 Available in VR
List Of Windows 10 Compatible Games
How Does WinRAR Make Money