Outlook is one of the best email clients out there, especially if you are in a corporate environment. Gmail for business and office 365 are both best, but I personally use Outlook at home and work so I think Outlook is great and gets the job done. This article guides you on how to turn off Email notifications in Outlook for one account if you have multiple accounts.
If you are like me and have multiple email account or email inboxes it can be very distracting to see all the notifications for new emails. Most of these notifications for me are login information, unnecessary subscription marketing emails, and other auto-generated emails.
You can definitely turn off all the outlook email notifications easily but you do not want to miss those urgent emails that you are either waiting for or need to action straight away.
I create a rule in outlook application that filters out the emails from certain email inboxes and only sends me an email notification for the account that is more critical to me.
Solution: Create a rule to turn on email notifications for some accounts in Outlook
Instead of creating a filter to filter out unwanted emails and finding out important emails to send the notification about. We will instead create a filter that gives me a notification if I receive an email in my important email inbox.
Step 1: Turn off the global notifications
First, let’s turn off all the notifications for emails in the outlook application.
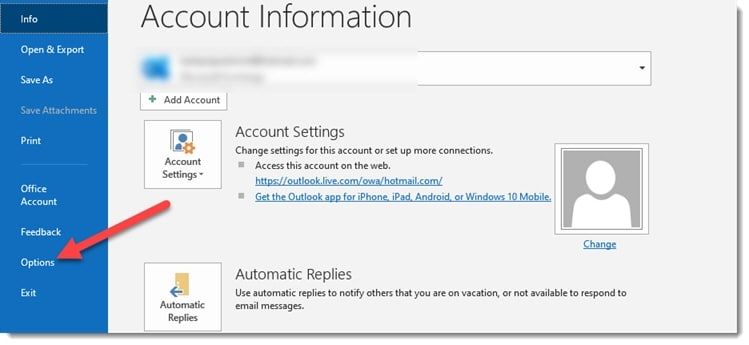
- Open outlook app, click on “File” from the top taskbar
- Click on “Options”
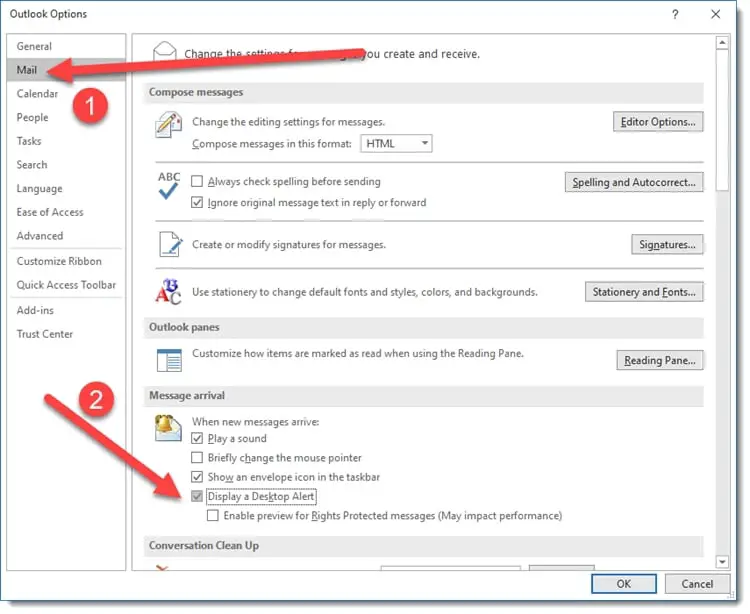
- In the new window, click on “Mail” from the list on the left side of the screen
- Scroll to the “Message arrival” section
- “Display a Desktop Alert” should be checked
- Uncheck that option and click on “OK”
Step 2: Enabling email notification for specific account
Now, we will turn on the notification for the email account that is important to us so that we don’t miss any emails.
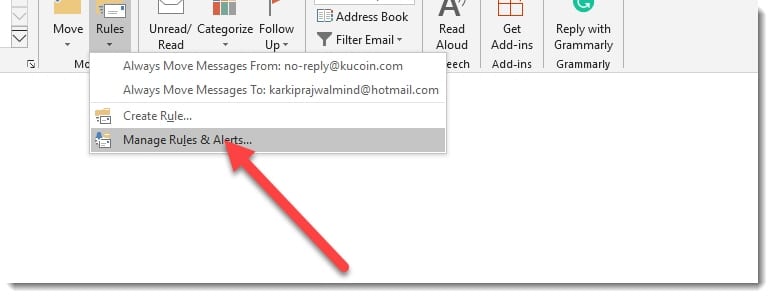
- Assuming you already have the outlook app open, click on the “Home” tab on the top taskbar
- Click on “Rules > Manage Rules & Alerts”
- Click on “New Rule”
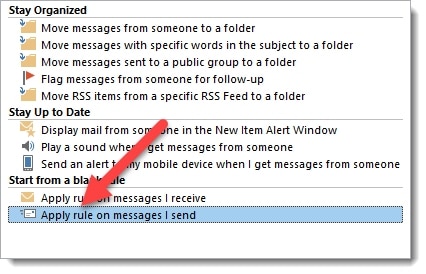
- In the new window, find “Start from a blank rule” and click on “Apply rule on messages I receive” and click on “Next”
- Next window gives you lots of conditions that you can select from
- Step1: Find the “through the specified account” option
- Step2: Click on the “specified” in step 2, this will open a small pop up window
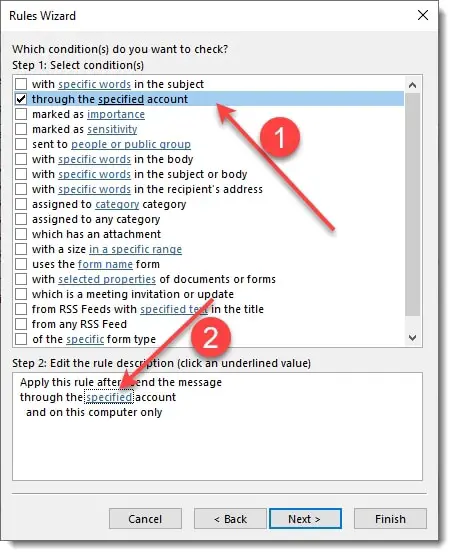
- From the drop-down option, choose the email account that you want to receive the notifications from
- Click on “OK”, double-check that you can see the account in Step 2 instead of the “specified”
- Click on Next couple of times and in the last screen you can give your rule a name
- Make sure you have the “Turn on this rule” option checked before you hit “Finish”
- Finally, click on “Apply”, “OK” and restart your outlook application
Step 3: Testing if the rule is configured properly
Other Outlook Tutorials
Changing Default Font and Font Size In Outlook 2016
Now send a test email to your email account and see if you do receive a notification for the account that you selected in the rule before.
The easiest way is to send an email to yourself from the account you are testing with.
That’s how you disabled notifications for outlook email accounts for one account or enable email notifications for only one account that you would like to monitor.