Enabling the Google chrome hardware acceleration feature ON allows you to make full use of the available hardware resources. It particularly comes in handy for processing GPU-intensive tasks e.g. processing a 4K video, playing an online game, and much more.
Google Chrome is a resource-hungry browser and at times regardless of how specked out your system is, you might still struggle. I use Chrome as my default browser on Windows 11 currently and I face this issue sometimes as well.
Using this guide you will not only be able to enable hardware acceleration in Chrome but also learn how to force chrome to use your GPU at all times on Windows systems.
I personally use an Nvidia 3070P GPU and have laid out the steps to force chrome to use NVIDIA GPU on windows down below. If you are using some other GPU and are not able to make chrome faster by toggling hardware acceleration in Chrome, let me know in the comments section down below.
Enable Chrome Hardware Acceleration In 4 Clicks
Toggling the hardware acceleration is very simple from within the Google Chrome browser. If you are here for other ways to force this after enabling it from the settings page, scroll to the section further down.
To toggle chrome hardware acceleration ON and OFF, do the following:
That’s how you can toggle the GPU acceleration settings On and OFF from within Google Chrome.
Now, let’s move on to much more advanced ways to force the Google Chrome browser to use your computer’s GPU for improved performance.
- Open the Google Chrome browser if it’s not running already.
- Click on the settings icon, which is on the top-right corner of the window. It’s a three dots icon as you can see in the screenshot below.
- From the tiny menu that pops up, click on “Settings”.
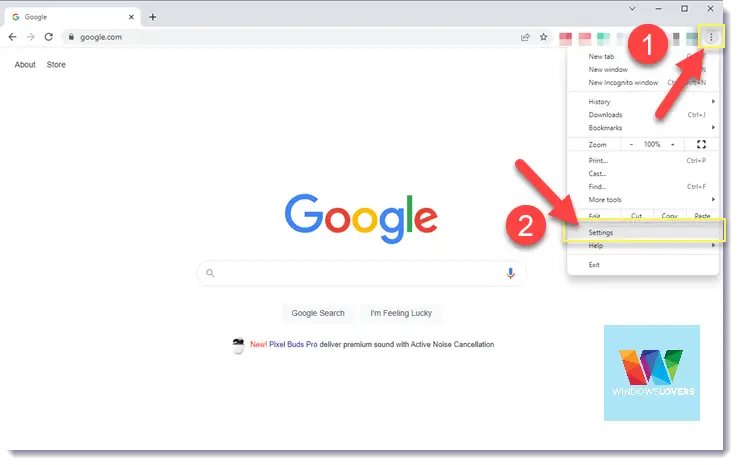
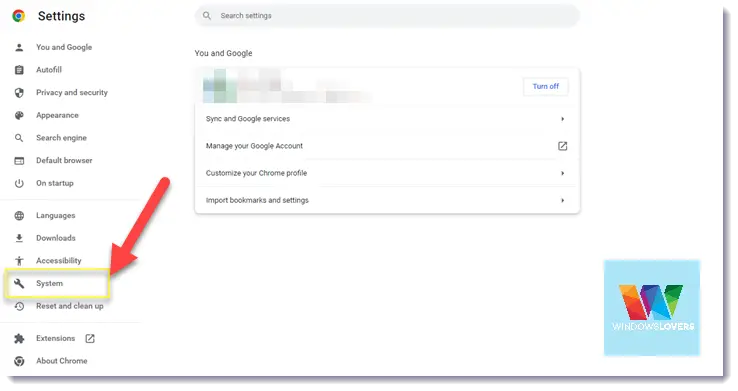
- This opens your Google Chrome’s settings page. From the options on the left, click on “System”.
- If you are using an older version of Chrome, you will find this option under “Advanced > System”.
- Click on the slider next to “Use hardware acceleration when available”.
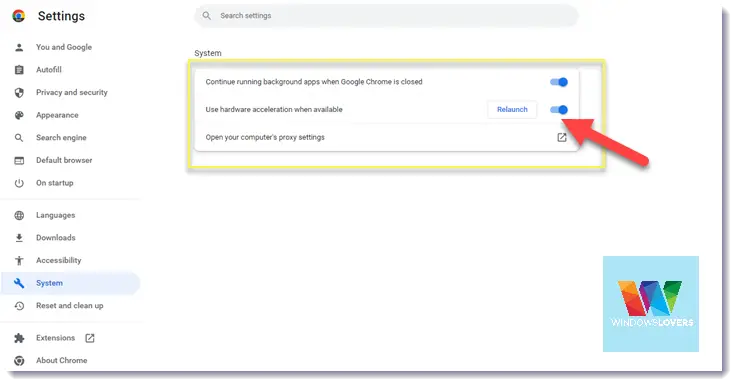
- You must relaunch the browser for the settings to take effect.
Enable Advanced Google Chrome GPU Flags
If you have never heard about or used Chrome flags, you can read my guide on best chrome flags which goes into much detail.
For the purpose of this guide, I’ll teach you how to enable certain flags that will enable advanced GPU capabilities for your Google Chrome.
To enable advanced Chrome GPU flags, do the following:
- Open the Google Chrome browser if it’s not running already.
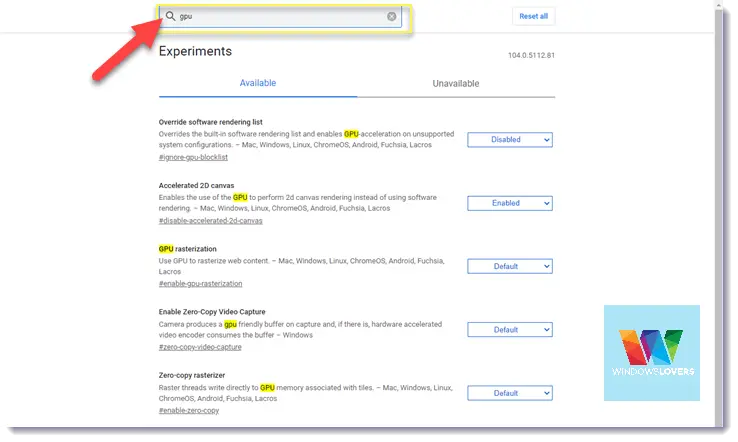
- Click on the address bar and type Chrome://flags and hit the enter key on your keyboard.
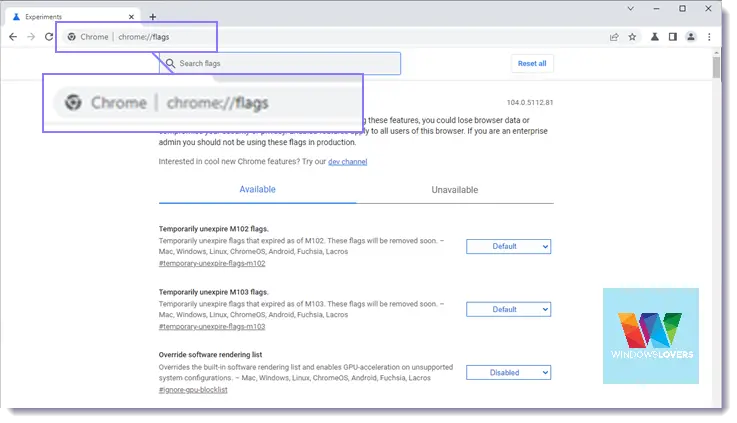
- This opens up a page from which you can enable different sorts of experimental features.
- Click in the search bar and type GPU. It will automatically list all the flags with the word GPU in them.
- Enable “Override software rendering list” and “GPU rasterization” by using the drop-down box next to these options.
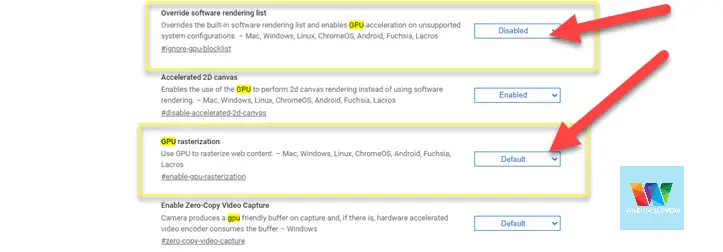
- You can play around with other Chrome GPU flags, but these two will have a more significant impact right away.
- Once enabled, click on the “Relaunch” button at the screen’s bottom-right corner.
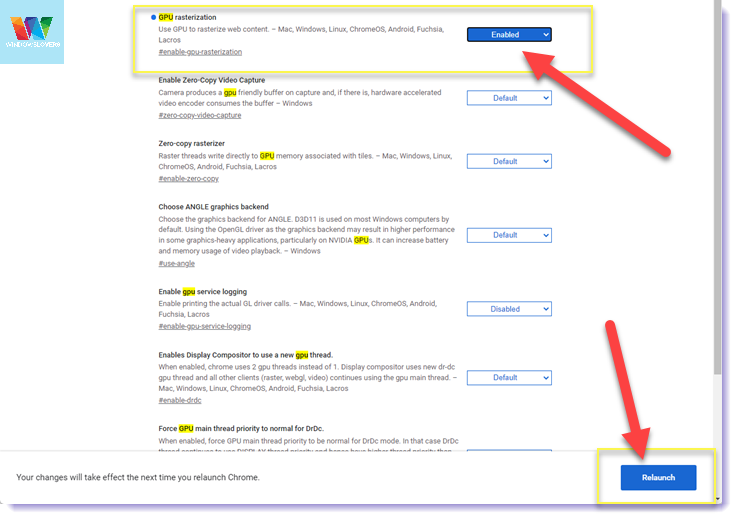
That is how to force google chrome hardware acceleration using Chrome GPU flags.
How To Force Chrome To Use Dedicated GPU in Windows
For anyone using Windows 10 or Windows 11, by default Windows chooses either an application that should use the internal GPU or the external graphics card (if available).
You can easily change this and force Chrome(Chrome.exe) to use an external GPU (Nvidia in my case) instead of the internal Intel graphics.
If you are not seeing much difference after toggling the Chrome hardware acceleration option from within the application, this should improve your performance drastically.
The screenshots below were taken on a Windows 11 system, but the same process applies to Windows 10 computers too.
To force Windows to use GPU for Chrome, do the following:
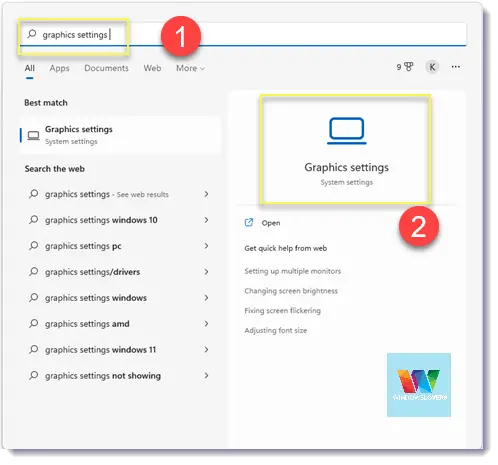
- Go to start or hit the windows key on your keyboard which brings up the start menu.
- Search for “Graphics Settings” and open it. See the screenshot below for reference.
- This lists all the applications that have access to or use the GPU for some kind of processing.
- Find Google Chrome in the list or just search for Chrome using the search feature.
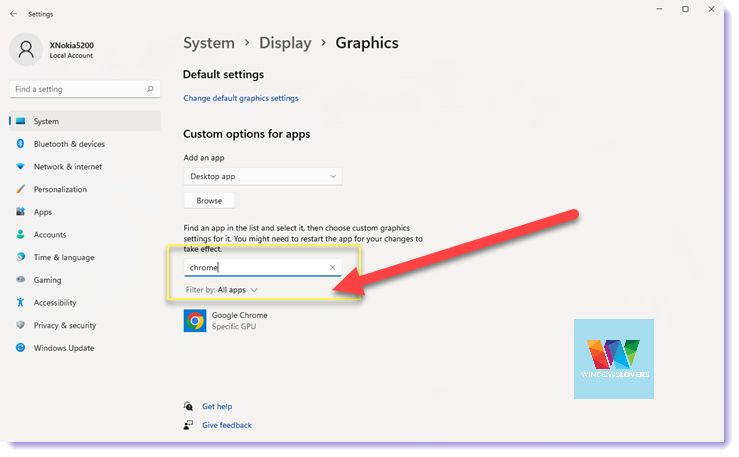
- Click on the “Google Chrome” icon and open “Options”.
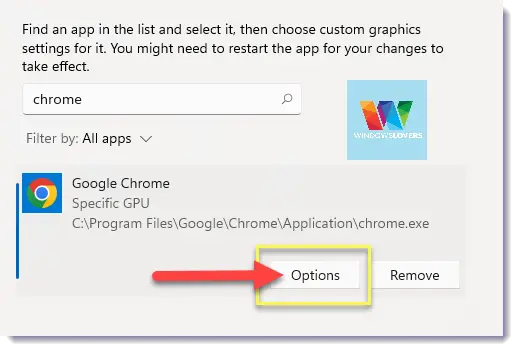
- Under “What do you prefer for graphics performance?”, you can either choose “High performance” or “Specific GPU”.
- I suggest you select “Specific GPU” and from the drop-down menu, choose your external GPU or graphics card.
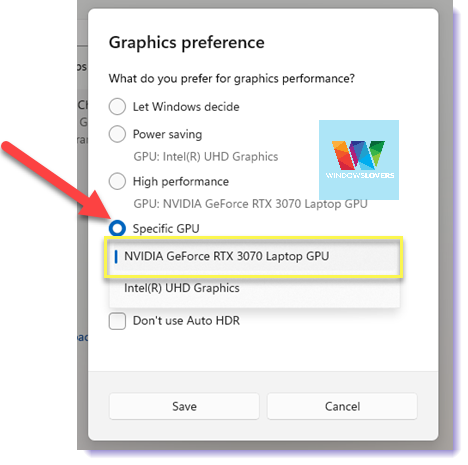
- Restart your system to make sure that the changes we just made are applied correctly.
Doing this will make your Chrome faster by quite a lot.
How To Force Chrome To Use Nvidia GPU?
If you have an Nvidia dedicated graphics card like me, you can manually force chrome to use your NVIDIA GPU.
I would suggest you make sure that you have the latest version of the Nvidia driver and control panel installed on your system before getting started.
Once you have that ready, the process is quite simple.
To force Chrome to use Nvidia GPU, do the following:
- Click on the start menu icon or press the windows key on your keyboard.
- Search and open “Nvidia control panel”.
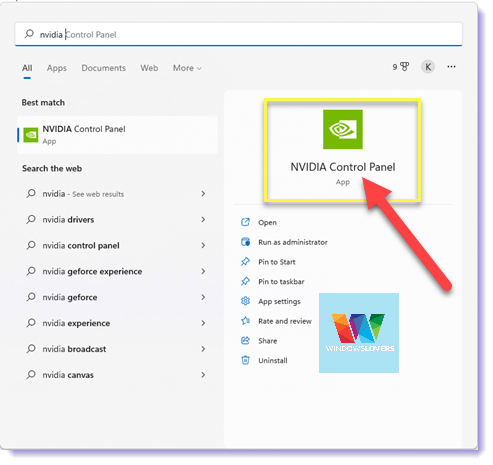
- Toggle the 3D settings on the left-hand side of the control panel window. See the screenshot below for reference.
- Click on “Manage 3D settings” which opens up a new page on the right.
- Select “Program Settings” under ” I would like to use the following 3D settings:”.
- Choose “Google Chrome (chrome.exe)” under “Select a program to customize:”
- Finally, select your Nvidia GPU under “Select the preferred graphics processor for this program:”.
- Make sure you hit the “Apply” button that pops up at the screen’s bottom-right corner before you exit.
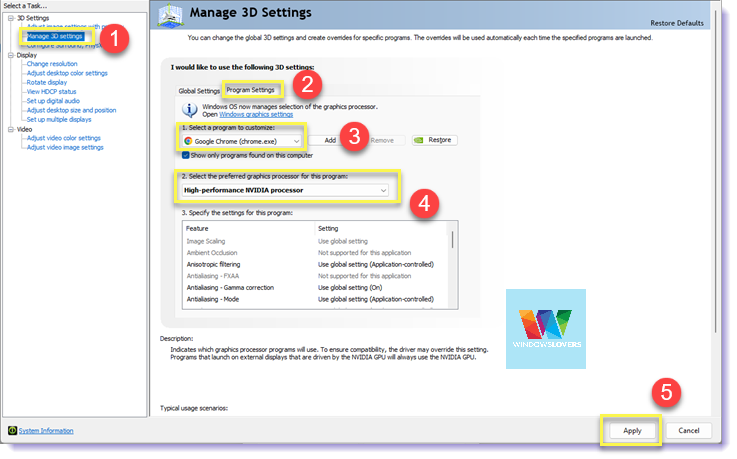
- I suggest you restart your system for the changes to be applied properly.
Please read the above-mentioned process to make sure you enable Google Chrome hardware acceleration with your GPU properly.
Only making this change will not guarantee that Chrome will use your external graphics card for processing 3D content or 4k videos.
Enabling Google Chrome Hardware Acceleration – FAQs
I’ve collected some of the frequently asked questions and issues that most users generally face while trying to enable hardware acceleration in Chrome.
If you have other questions or issues, please leave them in the comments section down below as I update this section as necessary.
It is the process of allowing Google Chrome to use the dedicated GPU for rendering and processing resource-heavy content. This can be useful to make chrome faster by a certain degree.
You can turn off the acceleration by going to “Settings > System > Toggling the feature ON or Off using the slider” and finally relaunching Google Chrome.
To fix this issue, enable GPU rendering from the settings. If that is not working, enabling chrome GPU flags will definitely get solve this error completely as long as your GPU’s driver is up to date.
If you are happy with Chrome’s performance on your computer, you don’t have to enable this. But if you are struggling to watch an HD/4K video or play an online game etc, using this will definitely help you make chrome run faster.

Where Are Chrome Bookmarks Stored In Windows or MAC
How To Update Chrome Extensions Without Uninstalling Them
Enable Picture In Picture on Chrome For Any Website
How To Make Chrome Default Browser On Windows
How To Clear Cache In Google Chrome and Mozilla Firefox