Google has finally incorporated a dedicated screen recording or screenshot tool with Chrome OS 89. Before this update, if you wanted to record your screen or take screenshots on your Chromebook, you had to download and install an extension or a third-party app from the app store. It was not as seamless as it is now with the official Google’s Chromebook’s screen recording app.
If you are creating online tutorials or just need to record your screen to demonstrate something for your next project, the Chromebook screenshot tool does it all. This is a step-by-step guide on how to screen record on a Chromebook without extension.
There is no need to download anything as long as your Chromebook is running the latest version of Chrome OS or Chrome OS 89 at least. If you are using Chrome OS 88, you can enable the screen recorder using Chrome Flags Settings.
How To Record Screen On A Chromebook Without Extension
There are multiple ways you can trigger start the screen recorder on your Chromebook. It’s always good to know a few keyboard shortcuts too which I have also mentioned in the guide below.
It does not matter what brand of Chromebook you are using as long as the tool is available on your Chromebook. Some of the Chromebooks brands that should have this tool are:
- Samsung Chromebook
- HP Chromebook
- Asus Chromebook
- Acer Chromebook
Accessing The Screen Recorder From The UI
Click on the time or the quick actions section on the bottom-right corner of the screen.
“Screen capture” should be the option right-under the Internet or Bluetooth icon.
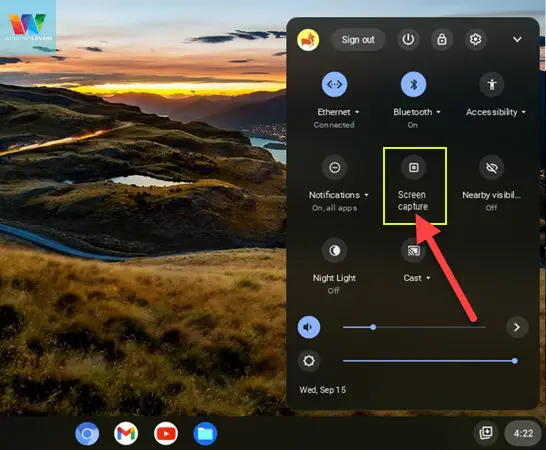
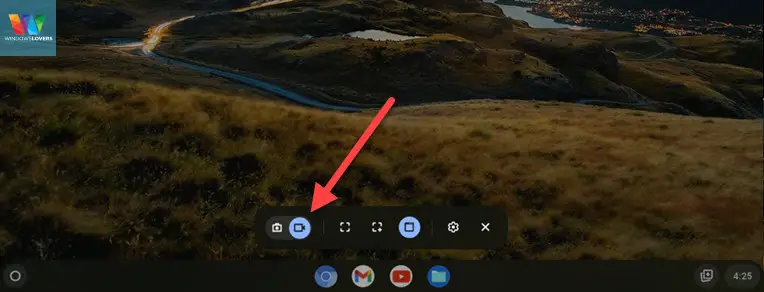
Once the tool opens up, you will see a new toolbar that pops up on the bottom center of your screen.
Click on the “Video” icon to switch from taking Chromebook screenshots to the screen recorder mode.
Chromebook Keyboard Shortcut For Screen Recorder
Chromebook’s keyboard layout is quite different as compared to other traditional keyboards especially the action keys on the top.
You can look at Google’s guide to learn more about your keyboard buttons if you are not yet familiar with them. One of the function keys on your Chromebook is called the “show windows key”. It has its own purpose as well but you can trigger the recorder to record screen on your Chromebook regardless of which app or what you are doing on the Chromebook.
Press the following keys on your keyboard simultaneously and it will open up the Chromebook screen recorder.
Ctrl + Shift + Show windows key
Finally, click on the “Video camera” icon to switch to screen recording mode.
Once you are familiar with how to access the screenshot or screen recorder tool on your Chromebook, let’s look at the features of this tool.
How To Record Your Chromebook’s Full Screen
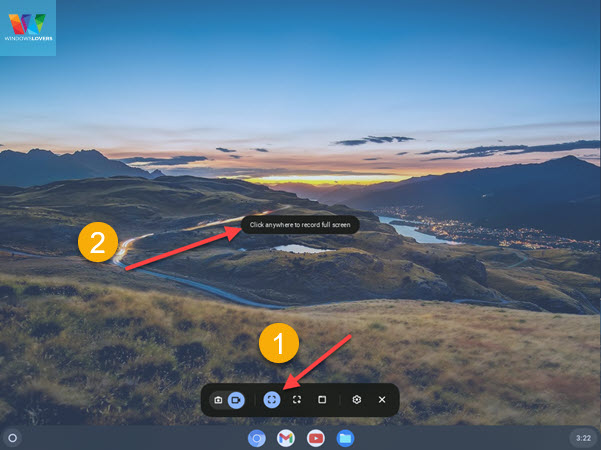
To record the whole full screen of your Chromebook, open the screen recorder tool, make sure it’s on the screen recorder mode.
Change the recording type to full screen by click on the fullscreen recording icon. ![]()
Once you are ready, you can click on anywhere on the screen to start recording your Chromebook’s screen.
A countdown timer will go 3…2…1 and the recording will start. To confirm that the screen recorder is recording your screen, you can look for a red recording icon at the bottom-right corner next to the time.
To stop the screen recording on your Chromebook, click on the same red icon on the bottom-right corner of the screen. Unfortunately, there is no dedicated keyboard shortcut or a key on the Chromebook to stop recording the screen and you need to click on the stop button.

How To Record A Section Of Your Chromebook’s Screen
This feature comes in really handy if you have multiple windows open and would like to only record a part of your screen. Chromebook’s screen recorder tool allows you to freely record a set area of your choice.
Trigger the screen recording app and switch to screen recording mode. The tool is by default set to record an area unless you’ve changed it otherwise. If it’s set to other modes, click on the icon on the center that gives you a prompt on the screen to “Drag to select an area to record”. ![]()
Click and drag to create a desired size window or box to record that part of your Chromebook’s screen. If you are very specific with the resolution of the video and would like to save time later on, keep an eye on the resolution under the box while dragging to create it.
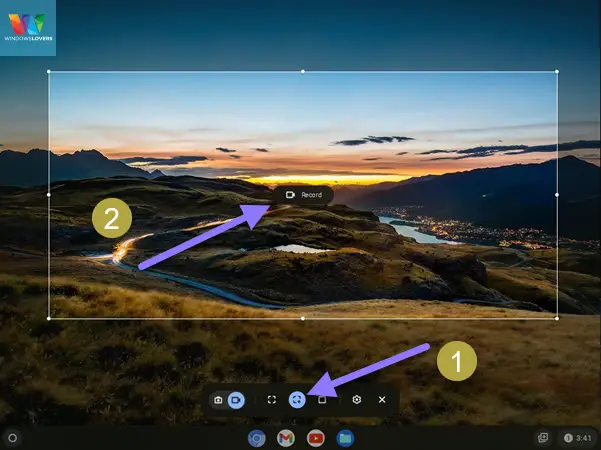
Once done, let go of your mouse and click on the “Record” button in the center of the box that you just created.
After three seconds countdown, the recording will start. Once done click on the red recording icon next to the time on the bottom-right corner of the screen. ![]()
How To Only Record A Specific Window/App On Chromebook
If you have an app or a webpage that you would like to record, this feature is your best friend.
You can create a section and move windows and apps in and out of that window. But if you are looking to only record a specific webpage, an app or a window using this feature also allows you to freely move that window anywhere on your Chromebook and still record.
Open the screen recorder tool and switch to the video recording mode. Make sure the app or the window you are trying to record is already open and is active on the screen.
Click on the window recording option from the toolbar and click on the window or app that you want to record. ![]()
The recording starts after a 3 seconds countdown and regardless of you moving the window will continue to record.
Do not minimize the window, while I was testing this feature while minimized, it looks like the recording stops if you minimize the window. I never got any suggestion or notification regarding this and stopped the recording by clicking on the stop button.
To stop the screen recording click on the red stop icon on the bottom-right corner of the screen. ![]()
How To Record Screen With Audio
Open the screen recorder with the keyboard shortcut or from the menu.
On the far right next to the close button, click on the settings icon. By default, the microphone is disabled while recording the screen, toggle the option by clicking on it.
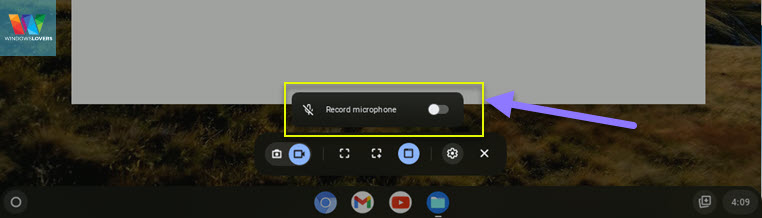
The app uses the Chromebook’s built-in mic to record the audio that plays or you speak while the screen is being recorded.
Where Are The Screen Recordings Saved
If you have taken screenshots on your Chromebook, you would know to access screenshots on Chromebook you need to go to the downloads folder.
To access the Screen recordings, on the other hand, you need to access the videos folder from the Files app.

Click on the launcher or the search key on your keyboard to access the launcher and search for “Files”. It’s always a good idea to pin the files app to the app shelf for easier and quick access in the future.
Open the videos folder from the left-hand side of the window and you should find all the screen recordings you have done on your Chromebook.
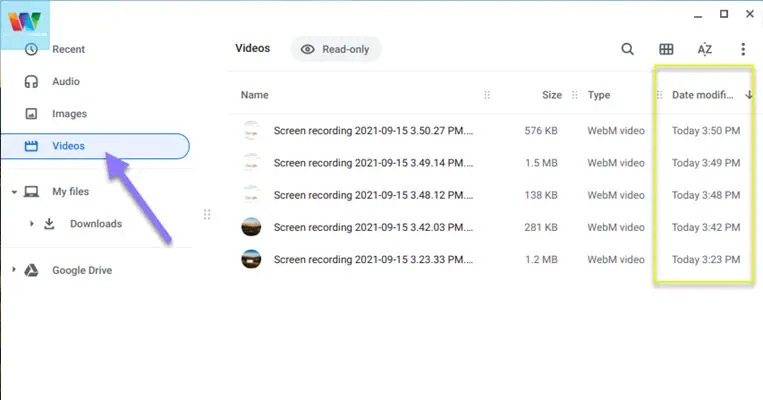
Since all of them have similar filenames, it’s a good idea to sort them by date of recording by clicking on “Date modified”.
Recording Without An App On Any Chromebook
This step-by-step guide should be sufficient to help you to record your screen on Chromebook. If you have any queries or suggestions, please leave them in the comments section down below.
Regardless of which Chromebook you use, the process for recording the screen remains the same.