If you need some additional drive in your system, then you can easily create a disk partition in Windows 10 on your own. By making the partition of the disk, you can manage and utilize your storage properly. You can’t keep all your photos, files, and documents all in one place. If you do so, your drive will be messy, and if your drive crashes, it might not be easy to recover all your important files.
Partitioning the disk adds slits to the figurative box, making it easier to keep it organized. That also means that if the operating system is corrupted, you’re more likely to be able to recover all of the other files. You must be signed in as an admin, and there must be either unassigned storage space or free space within an expanded partition on the hard disk to construct a partition.
You can generate unused disk space by reducing an existing partition, removing a partition, or using a third-party partitioning program if there isn’t any. You may use Windows’ default disk manager or third-party tools to partition the drive, but we’ll concentrate on the built-in disk manager in this article.
Note: Before performing any partition work on your drive, make sure that you have created a proper backup plan so that if anything happens, your files will remain safe.
Create Disk Partition in Windows 10 Using Disk Management
To create a disk partition, follow the following steps:
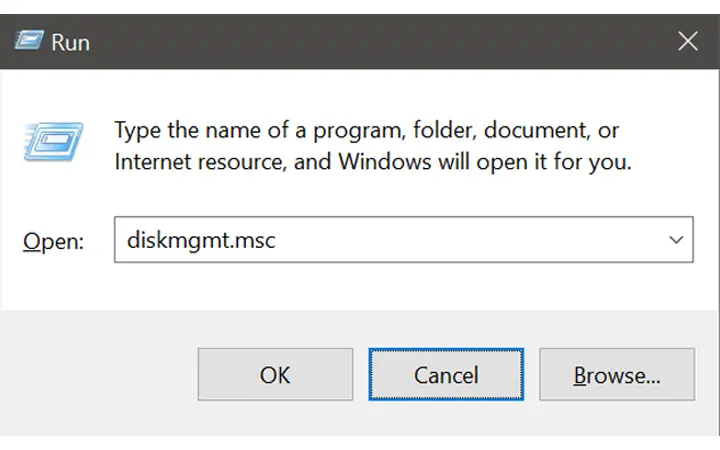
Step 1: First, you need to open your run command. For that, press Windows + R key on your Windows screen.
Step 2: There run box will appear. In the run box, type ‘diskmgmt.msc’ and press the enter key.
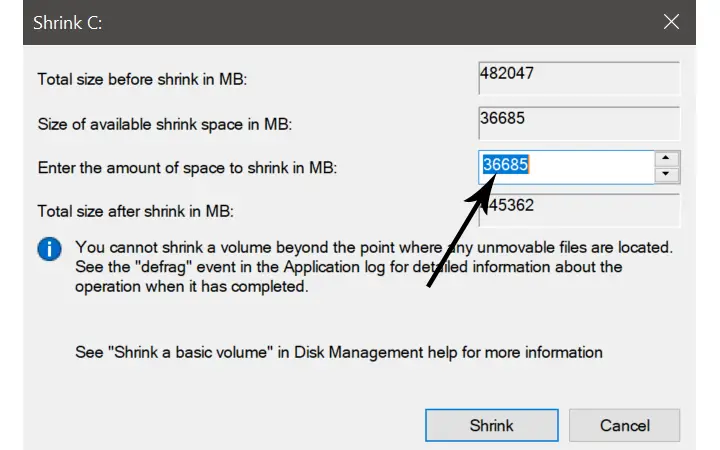
Step 3: A menu with a list of all your hard drives will appear. Pick ‘Shrink Volume’ from the context menu of the hard disk partition you want to shrink.

Step 4: A small pop-up box will appear where you have to enter the amount of memory you want to shrink. So, enter the amount of memory in MB and then click on the ‘Shrink’ button.
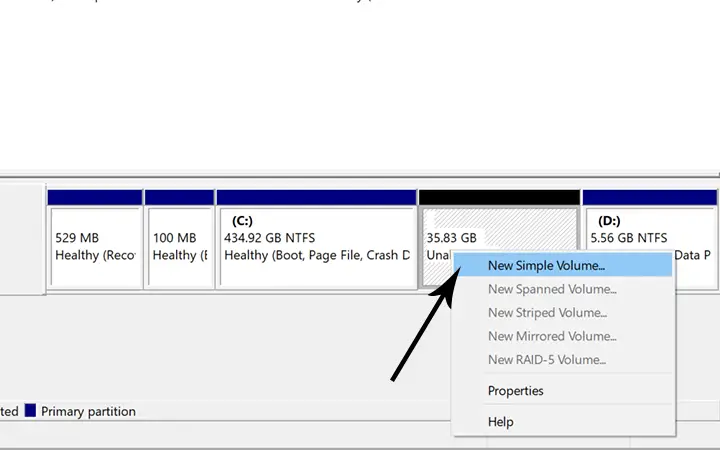
Step 5: Wait few seconds for the process to complete. Then right-click the new box at the bottom of the Window that opens. It should include how much data you shrunk as well as the term ‘Unallocated.’ There, pick ‘New Simple Volume’ from the right-click menu.
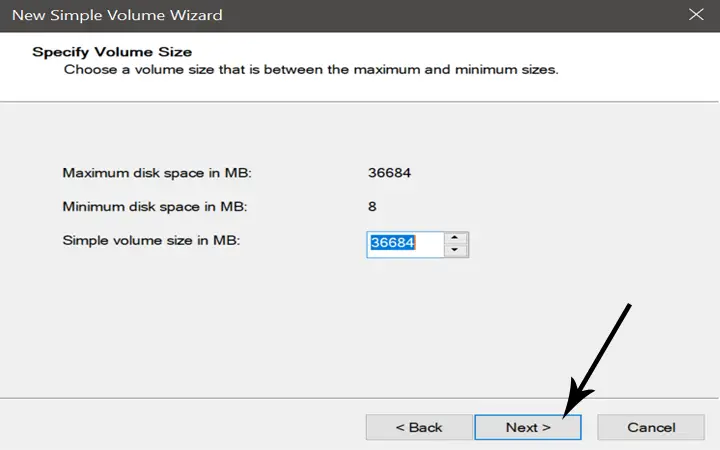
Step 6: To build the partition, use the New Simple Volume wizard’s instructions. This allows you to choose the partition’s size and the letter to which it would be allocated.
Step 7: Also assign the new drive name and then click on the Next button. Then in the file system, select NTFS and click on the Next button.

Step 8: Now, at last, click on the ‘Finish’ button to complete the partition process.
Why Create Partition?
There are several reasons for which partition of the disk is very necessary and helpful. Some of the reason for creating partition are given below:
- Having several ‘drives’ rather than creating several files on a single drive is a more straightforward way to arrange the data.
- Creating multiple partitions helps to create a secure backup. Suppose your operating system is in the C drive, and your other folder is also in the same drive. In this case, if you want to reinstall your windows or your windows crash, then everything will be gone. So, it’s better to keep your files separately in another drive by creating a partition.
- Moving less frequently used data to a different partition will increase the speed depending on how you use your data, particularly if you’re using a magnetic hard disk (HDD) rather than an SSD.
- Each operating system must live in its partition if you choose to install several operating systems on your machine and select which to boot into. It’s also popular to make a separate data partition that they all use.
Final Thought
If you have a clear justification for partitioning, go ahead and do so. Remember that you’re only using a single hard disk, and all of the partitions must be appropriately handled and backed up.
I hope from this article you have learned why partition is essential and how to create a partition in few minutes. If you have any questions regarding this article, let us know in the comment section.