You might be familiar with the word Office 365. If you are looking for a guide to create Office 365 email account and business account, then you are at the right place.
Microsoft 365 is a cloud-based management suite that will help you fulfill your passion while still running your business. With office 365, you will get various apps like Word, Powerpoint, Excel, Outlook, Onedrive, etc., and various cloud-based services and securities.
Create a New Office Email Account and Business Account
Today we will see how you can download and set up Microsoft Office 365 for your business. This article will also demonstrate how to connect new email addresses to an existing Office 365 user account.
Download Office 365 Business Account
Let’s see how you can download and set up an office 365 business account. But before moving towards the download process, here are the three basic requirements you need to have before using Office 365.
- Need a business email account.
- Don’t use the main business domain. Create a new domain dedicated to cold mailing.
- Email software
So first, create your business email account and register a domain if you don’t have one. After that, let’s move towards the step where you can see how to download and set up Office 365 for business.
Step 1: Go to Microsoft Office 365 download page. To go to the download page, click here.
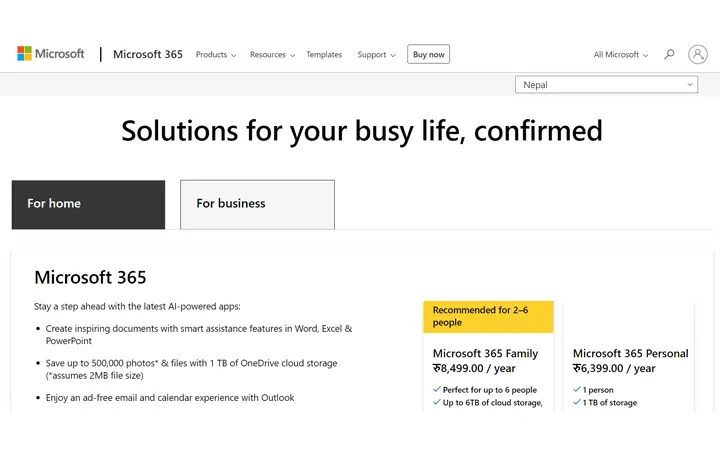
Step 2: Click on the ‘For business’ option.
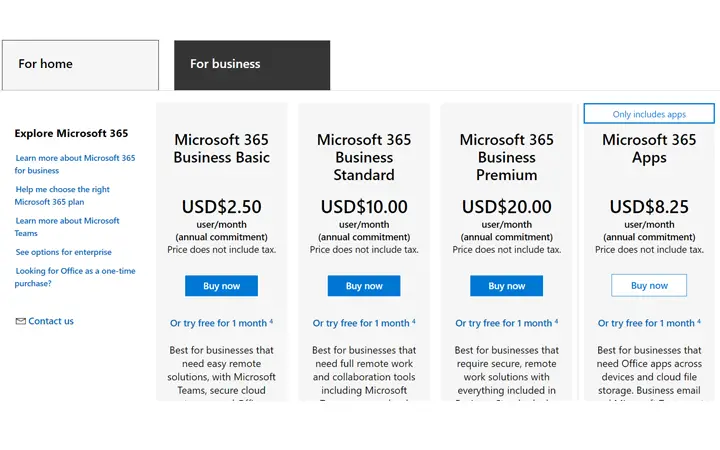
Step 3: From the business option, select the business package that you want to download. Here I will download the basic business package.
Step 4: Now, your setup page appears where you have to provide basic information before downloading office 365.
Step 5: At first, enter your business email address and then click on the Next button.

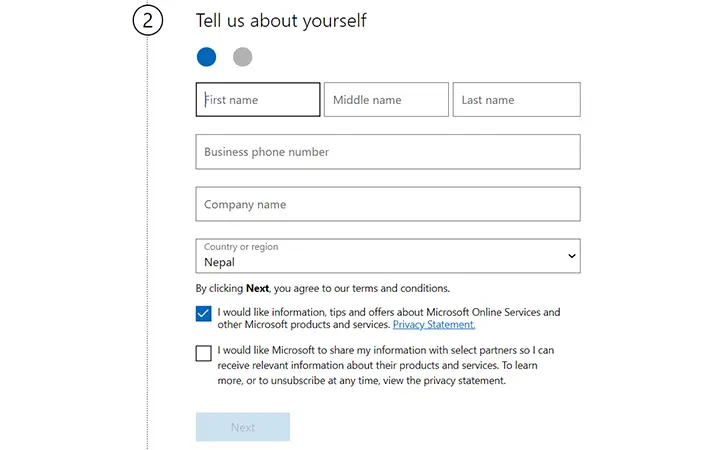
Step 6: Then click on the ‘set up account’ option, and there fill your and your business details.
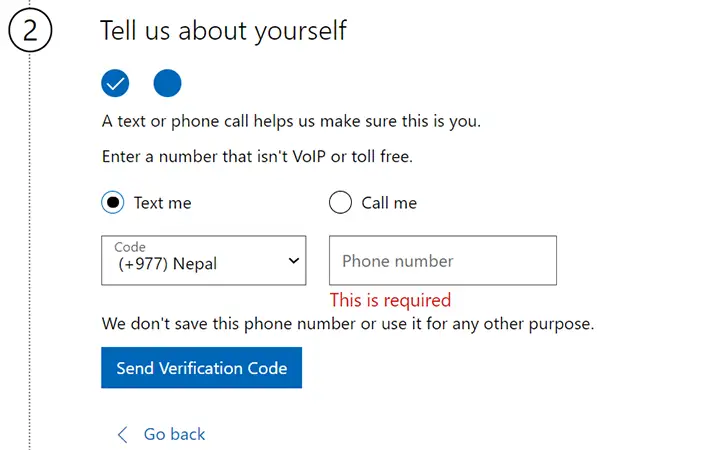
Step 7: Click on the Next button and then enter your phone number. A verification code will be sent to your mobile phone. Verify your number and move to the next step.
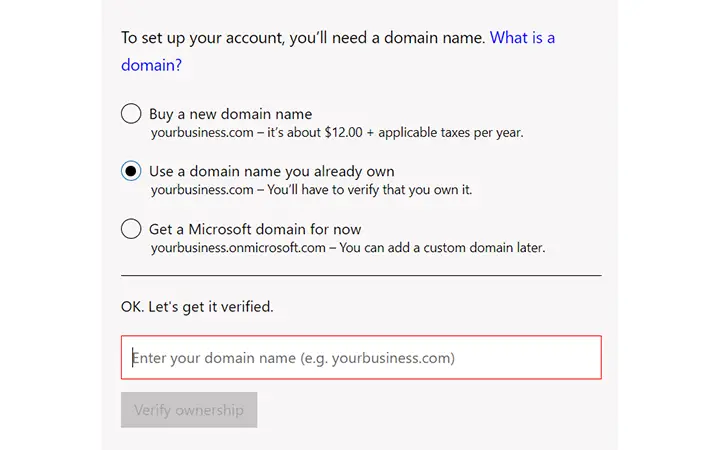
Step 8: In this step, you have to provide your domain information. Enter your domain name and click on the ‘Verify Ownership.’
Step 9: Now enter your name and password and then click on the ‘Sign Up’ option. After that, select the number of users that you want to have access to Office 365.
Step 10: Finally, move towards the payment option. Enter your payment details and click on the Next button.
Set Up Office 365 Email Account and Business Account
After confirming your purchase for office 365 now, let’s see how to do a basic setup that will be helpful for your business in the following step:
Step 1: In the order confirmation page, click on the ‘Go to setup’ button.
Step 2: Now, you will enter the admin section. Here choose the use default domain option, and then at the bottom, click on the ‘Use this domain’ option.
Step 3: If you want to add more users, then you can add in this step. If not, then click on the ‘Do this later’ option.
Step 4: If you want to send or receive any emails through Outlook, you have to set up some mail server records. For that, click on the ‘More options.’
Step 5: Then choose the ‘Add your records’ and then click on the continue button.
Step 6: It will provide you a list of records. You have to copy the records and then paste them to the domain provider. The provider clicks on the add button in the domain and then chooses MX in the type, and then fills in other information.
Step 7: Similarly, in the domain provider, add CNAME records and TXT records as well. Then click on the ‘Continue’ button.
Step 8: We are almost done. Now again, click on the ‘Continue’ button and then click on the ‘Go to the admin center.’
In this way, we have completed the email setup for our office 365 business account. You can click on the menu and then Outlook and send or receive emails from the main dashboard.
Add Office 365 Email Address to Existing Account
Step 1: Open your Outlook Account.
Step 2: Click on the File and then tap on the ‘Account Settings.’
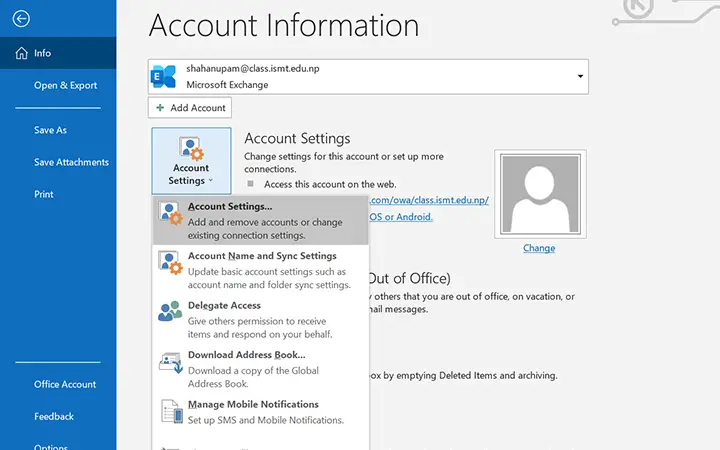
Step 3: A new Windows box will appear. There click on the ‘New’ button.

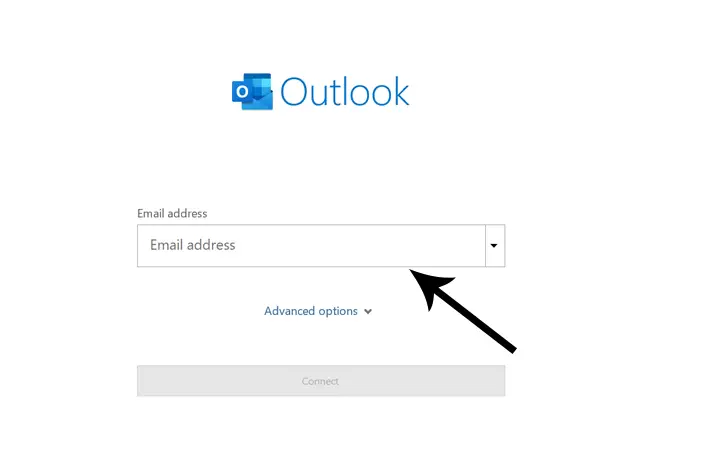
Step 4: After that, enter the new account email address and the password.
Step 5: Now, a confirmation message will display. Click on the ‘Allow’ button.
Step 6: After that, click on the Done button, and then your new email address will be added.
Conclusion:
That’s all for the setup process of the Office 365 email account and business account. If you have any confusion regarding the setup process or Office 365, let us know in the comment section. We will be there to answer all your queries.